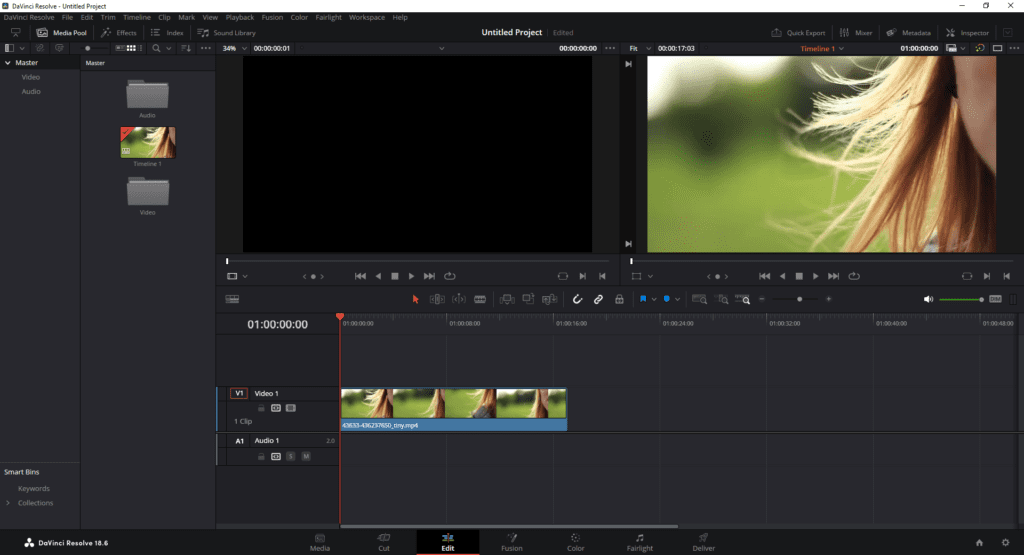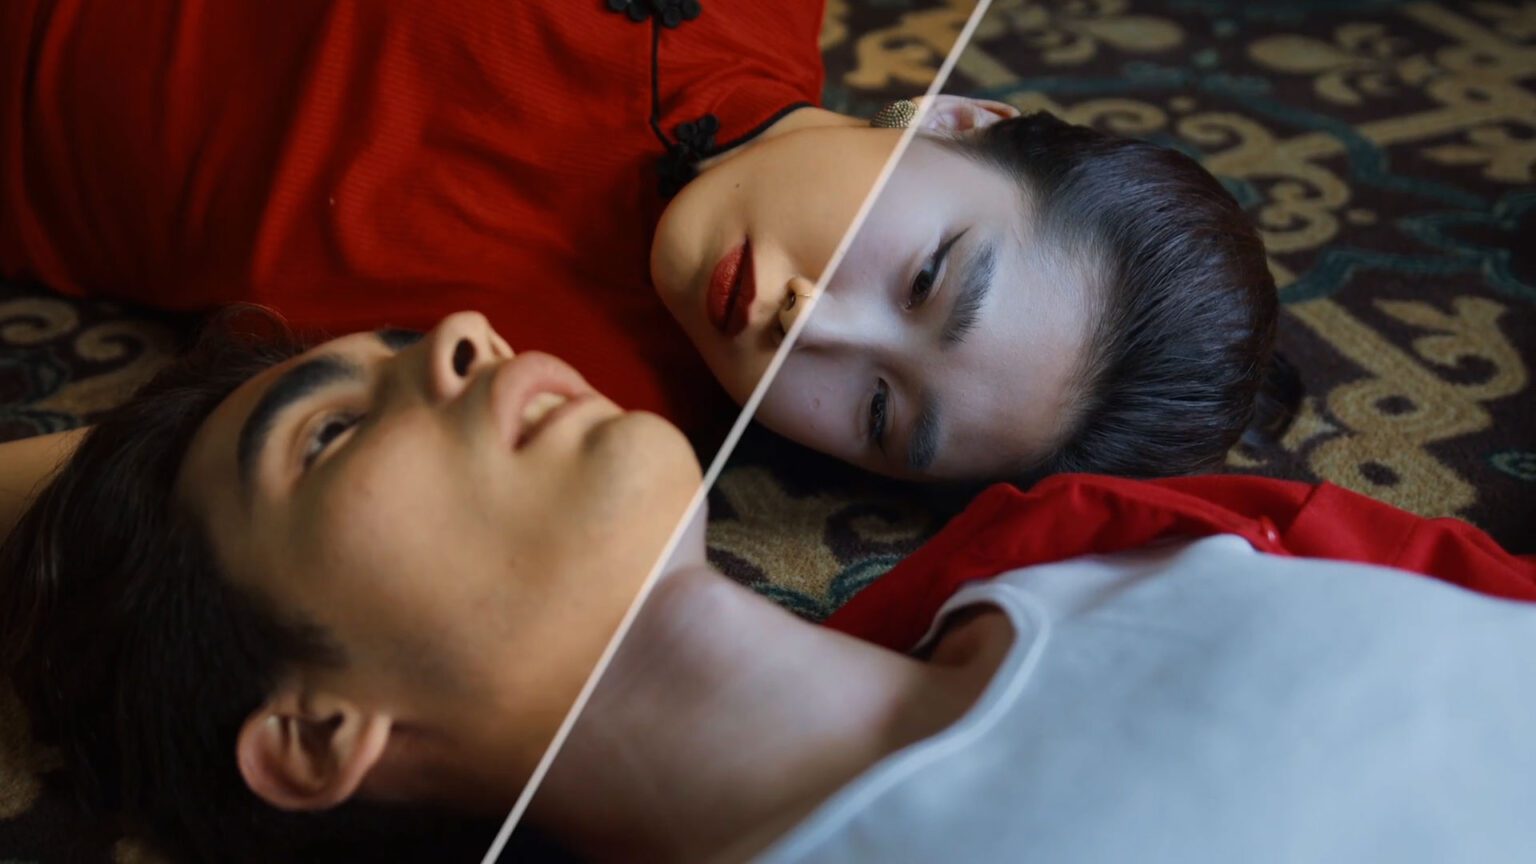
DaVinci Resolve has a reputation for excellence in color correction, making it one of the top choices for hobbyists and industry veterans alike. Whether creating a feature film or a YouTube video, mastering color correction is crucial for turning raw footage into a captivating movie.
In this DaVinci Resolve color grading tutorial, we’ll cover all you need to know about color grading in DaVinci Resolve, starting with the basics and moving through some advanced techniques. By the end of the article, you’ll have the color grading know-how to ensure each frame captures the look you’ve envisioned.
Note: Screenshots in this article are from DaVinci Resolve Version 19.0B Build 59. If you use a different version, your settings may appear in different places.
What is color grading?
Color grading is an essential process that helps you set the atmosphere, evoke specific emotions, and enhance the narrative of a video by making intentional stylistic choices through your color palette. It helps draw focus to key elements and tones to make the audience feel a certain way about each scene.
For example, you might use warm, golden hues to produce feelings of nostalgia and warmth during a sentimental scene. In contrast, a thriller might use a desaturated, blue-tinted color palette to create a cold, unsettling atmosphere.
By manipulating the colors in this way, you can subtly influence how viewers react to different scenes, guiding their emotional responses without them even realizing it.
Note that color correction and grading are video editing terms. Color correction focuses on making the colors as accurate or balanced as possible, and it takes place before grading. Color grading goes beyond this to introduce stylistic choices that support your story and creative vision.
Uses for color grading
Color grading enhances the visual appeal and storytelling of your footage, setting the mood, tone, and style. Here are some of the creative and technical uses for color grading in video production:
- Set a tone or mood for a footage clip or film. Dark, dramatic color grading can enhance the mood of a film noir or murder mystery, while making colors more vibrant and cartoony can work better for videos for children.
- Create a visual aesthetic for your videos. Directors like Wes Anderson are well-known for their signature visual aesthetic, partly due to consistent color grading. For companies and organizations, using color grading to enhance colors that correlate with your visual identity can be a way to subtly brand your videos.
- Indicate a specific time or era in history. Specific color grading can give your videos a feeling of time and place. For example, sepia tones indicate a historic setting, while desaturated colors could indicate a post-apocalyptic future.
Overview of the color page in DaVinci Resolve
In DaVinci Resolve, the color page is a workspace specifically designed for color correction and grading. It provides a range of powerful tools and features that let you fine-tune the look of your footage easily.
Color wheels
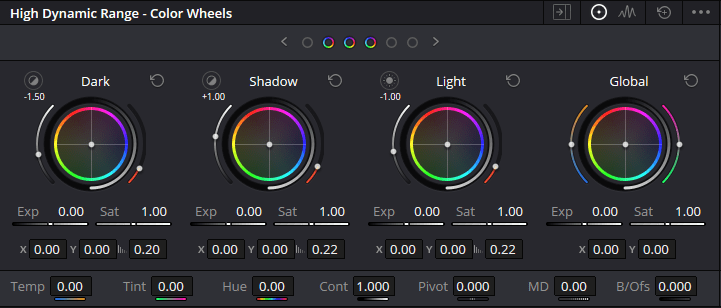
There are two main types of color wheels: Primaries, and HDR color wheels.
The Primaries – Color Wheels include the Lift, Gamma, Gain, and Offset wheels. Offset is the broadest tool that can be used to move the entire image in a certain direction. Lift affects shadows, gamma affects the mid tones, and gain adjusts highlights.
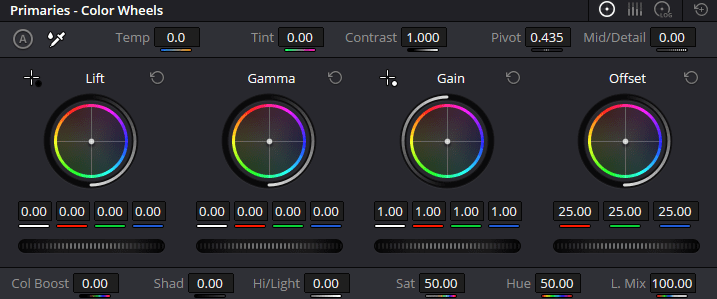
The HDR color wheels in DaVinci Resolve are advanced tools specifically for high dynamic range (HDR) grading. These wheels provide finer control over a wider range of luminance values, letting you make targeted adjustments without compromising the details.
Curves
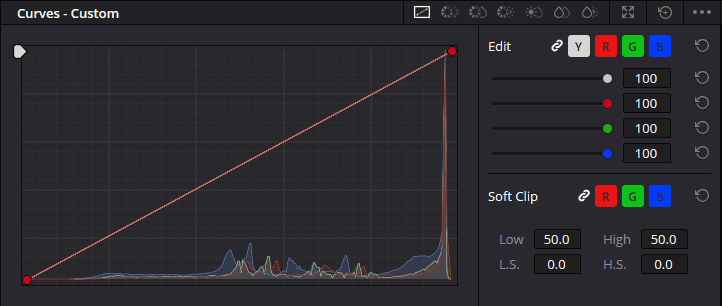
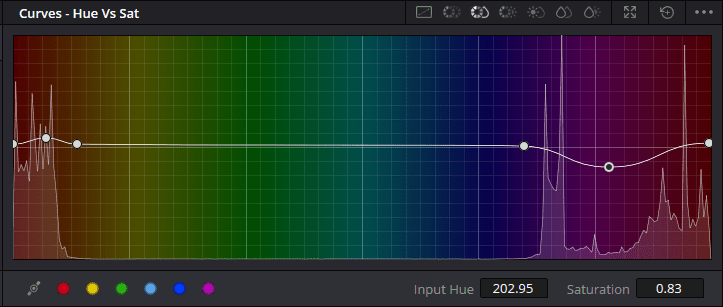
Curves allow for more nuanced adjustments of the image. They include Custom Curves for RGB and luma adjustments, as well as specific curves for Hue vs. Hue, Hue vs. Saturation, Hue vs. Luma, Luma vs. Saturation, and Saturation vs. Saturation.
Scopes
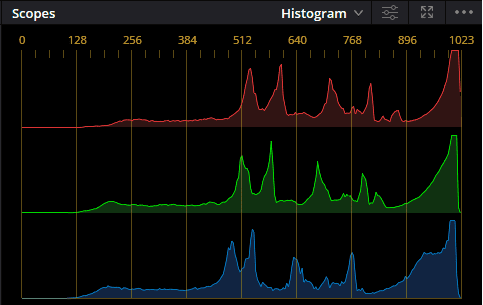
Essential for accurate color grading, the Scopes provide visual representations of color data within the image. DaVinci Resolve offers several types of scopes, including:
- Waveform Monitor: Displays the brightness (luma) levels of the image.
- Vectorscope: Shows color distribution and saturation, useful for skin tones and color balance.
- Parade: Splits the image into RGB channels, helping with color correction and ensuring balanced tonality.
- Histogram: Displays the tonal distribution of the image.
Nodes
Color grading in DaVinci Resolve is done using nodes. While it’s possible to complete a color grade using one node, it’s much easier to organize and keep track of your grade if you use a basic node tree structure.
Each node is a layer and should represent an individual color effect. Combined, they’ll result in the final look of your footage. Unlike linear editing systems, nodes let you connect, rearrange, and modify specific parts of your footage without affecting your entire color grade.
Don’t worry about this too much for now—below, we’ll explain how to create a basic node tree for a simple color grade.
How to color grade in DaVinci Resolve
In this section, we’ll guide you through a basic color grading workflow and explain the main grading tools in DaVinci. A useful tip is to get a still from your favorite movie and try to match its grading as we move through each step.
If you find yourself struggling at any point, check out our guide on the basics of how to use DaVinci Resolve to learn more. You can also watch the video tutorial below to follow along with us in real time.
Step 1: Set DaVinci’s color space settings
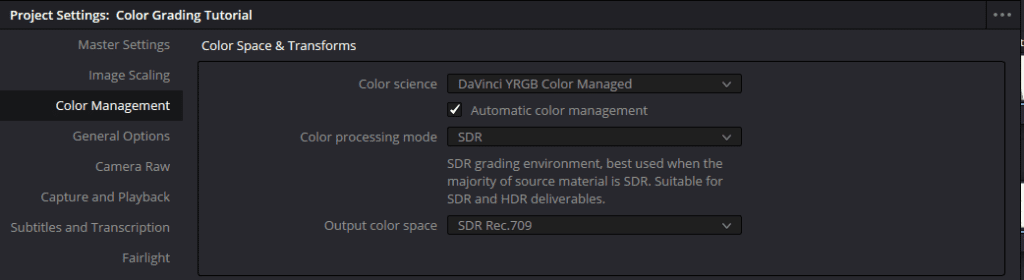
The first step is to configure your video’s color space settings to ensure consistent color, contrast, and gamma across different devices. Rec.709 is the standard color space and it simplifies further grading and enhances color accuracy. For log and flat footage, converting the color space to Rec.709 helps you maximize your dynamic range and color detail.
Press File > Project Settings and select the Color Management tab. Select the Color science drop-down menu and choose DaVinci YRGB Color Managed, then do the same for the Output color space menu and select SDR Rec.709.
Step 2: Create a basic node tree to work from
DaVinci uses a node-based system for color grading. Each node represents a different part of the color correction and grading process, helping you organize your workflow and perform non-destructive edits at each stage.
When it comes to node trees, there’s no one-size-fits-all solution. Every scene and project will require a different process, and many colorists have unique approaches that bring a personal touch to their work.
However, you can apply a basic node tree format to every scene, adding more as required to make it more complex. We recommend using something like the following structure:
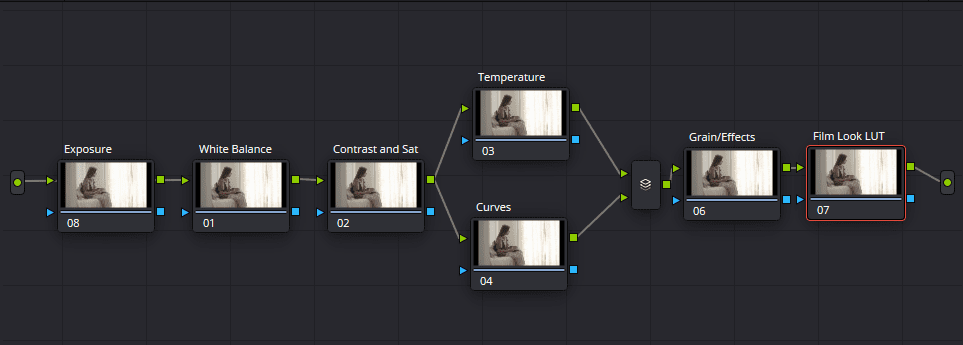
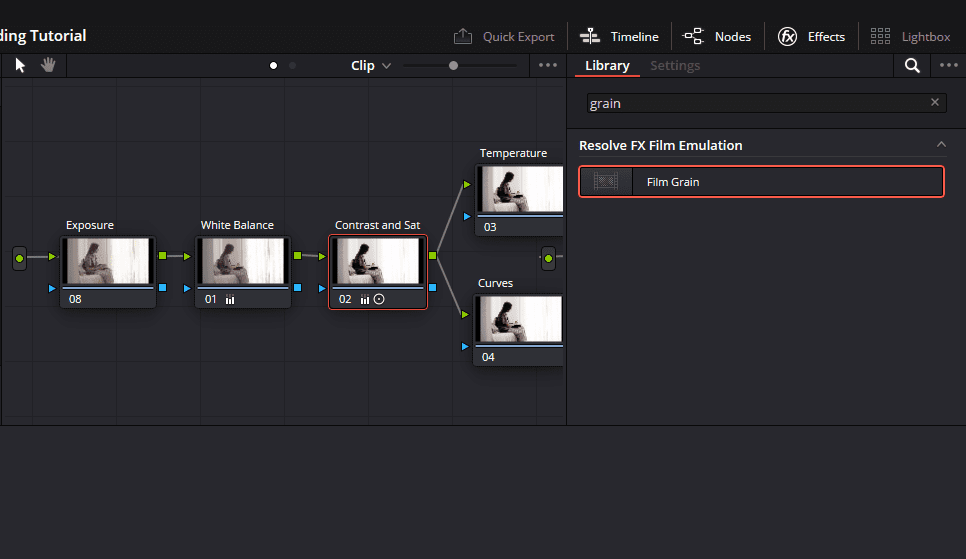
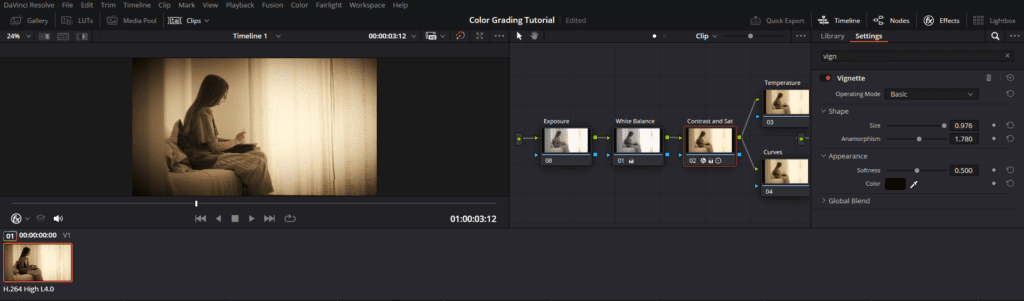
Here, we start with color correction (balance and exposure) and then create a specific look with contrast, saturation, temperature, and curves. The reason we use parallel nodes for temperature and curves is to apply multiple color corrections without having them compound on top of each other.
To create your node tree, press the Nodes button in the top-right, then press the Alt + S keyboard shortcut to add serial nodes. Press Alt + P to add parallel nodes (switch out Alt for Option if you’re using a Mac).
Step 3: Add a LUT (optional)
If you’re going to add a finishing LUT to change the look of your footage (like a film emulation LUT) you’re going to want to add it before grading. Adding it before you complete your color grade lets you grade beneath the node so that you can see how your changes will look with the LUT applied.
To import a LUT and add it to your footage, right-click the Film LUT node and select LUTs. Select the LUT of your choice that matches your footage.
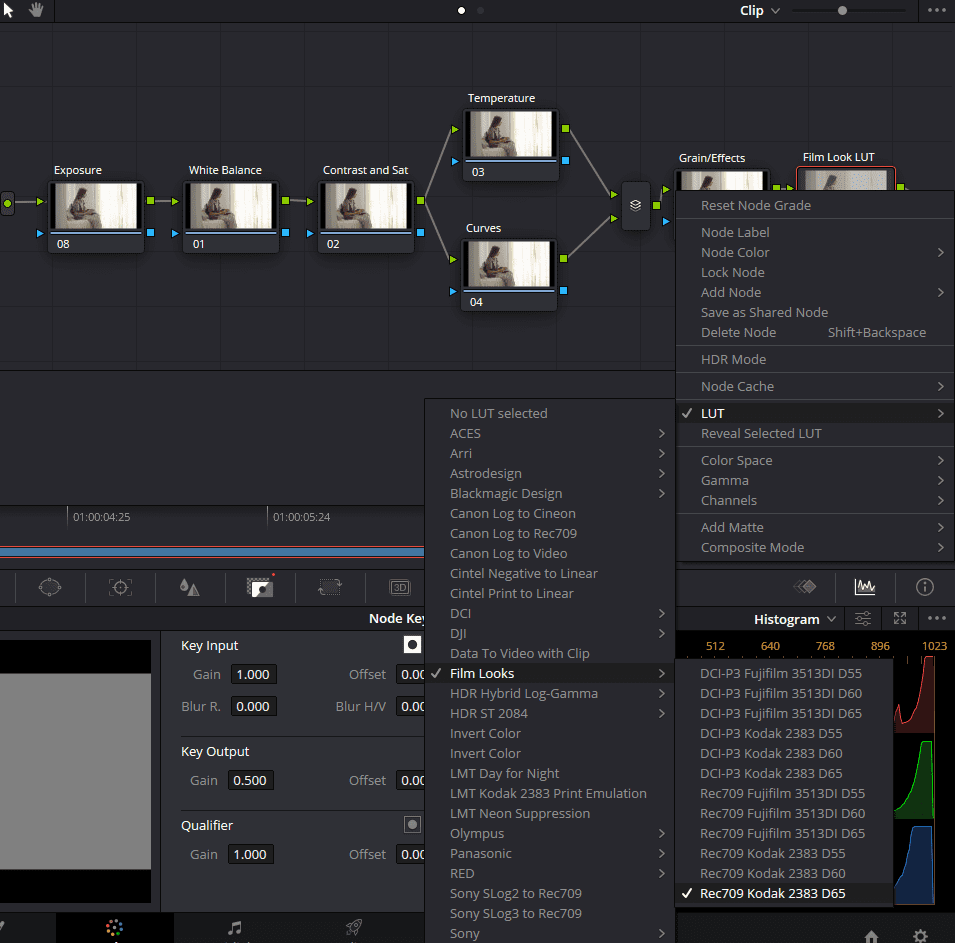
If your LUT is too strong, head to the Key tab and bring down Key Output until you’re happy.
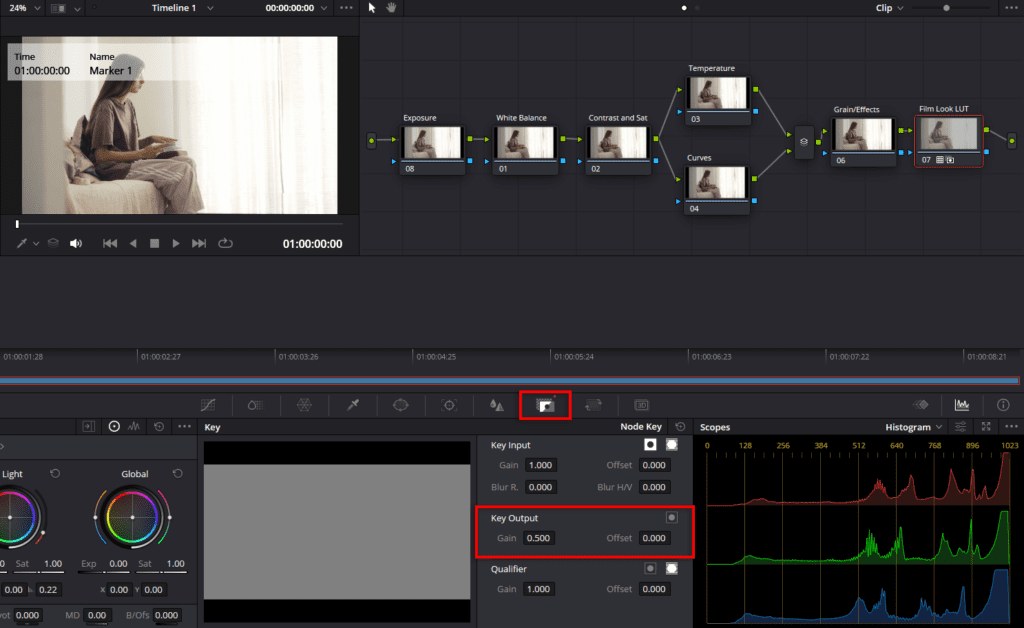
Note: A finishing LUT isn’t the same as a technical LUT which changes the color space of your footage. If you’re using a technical LUT, you may need to apply it first, before color correction.
Step 4: Set the correct exposure
Next, you need to ensure that you have the correct exposure. Select your Exposure node, then open Primaries – Color Wheels. Adjust the Exposure bars (just below each color wheel) until you’re happy with the result.
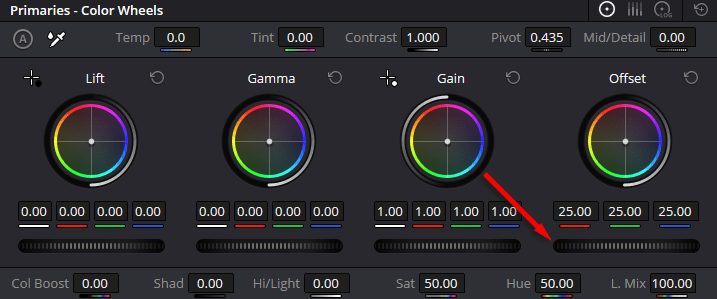
Start with global exposure by moving the slider below the Offset wheel. After that, change the Lift, Gamma, and Gain exposures if you need to fine-tune parts of the image.
While you change the exposure, pay attention to the histogram. Be careful not to blow out your highlights or clip your shadows.
Step 5: Adjust your white balance
Now it’s time to correct your footage and get an accurate white balance. There are many ways to correct your white balance, including primary color wheels, curves, qualifiers, and log controls. The easiest way is to use the color wheels.
Select the Balance node and open the Primaries – Color Wheels tab. Just like for exposure, each wheel affects the colors in different parts of the image. Offset affects the image globally, so it’s the best tool to perform white balancing.
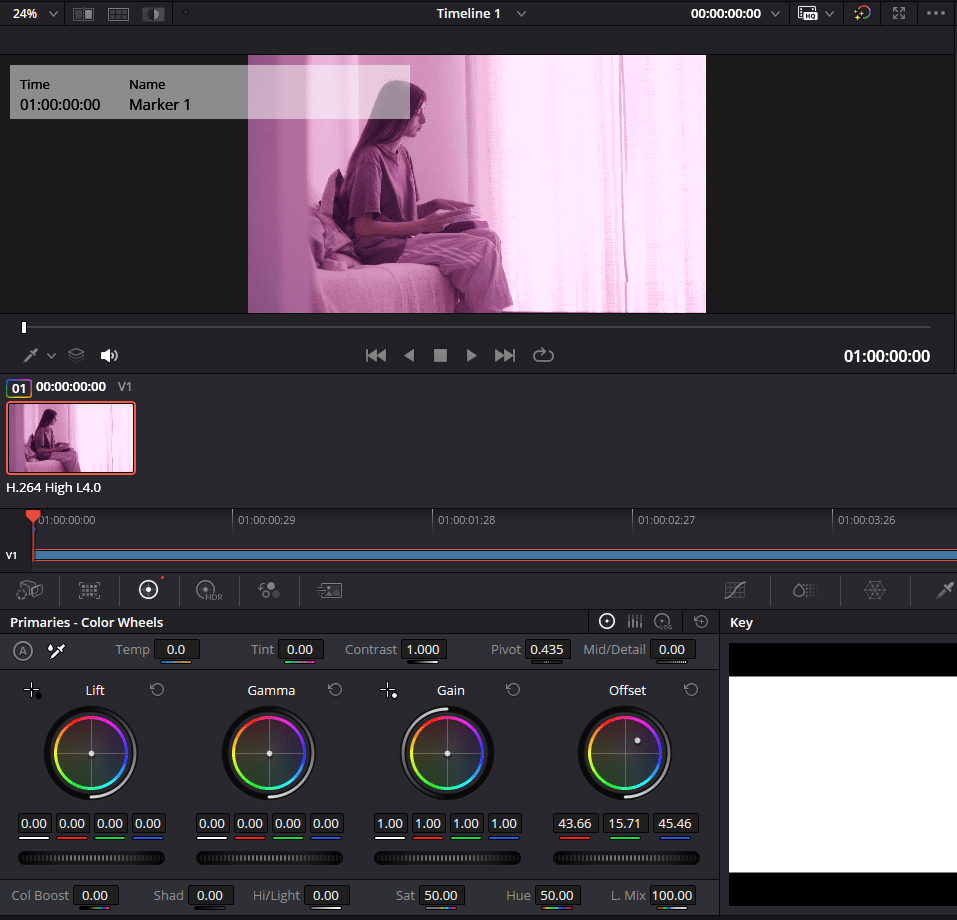
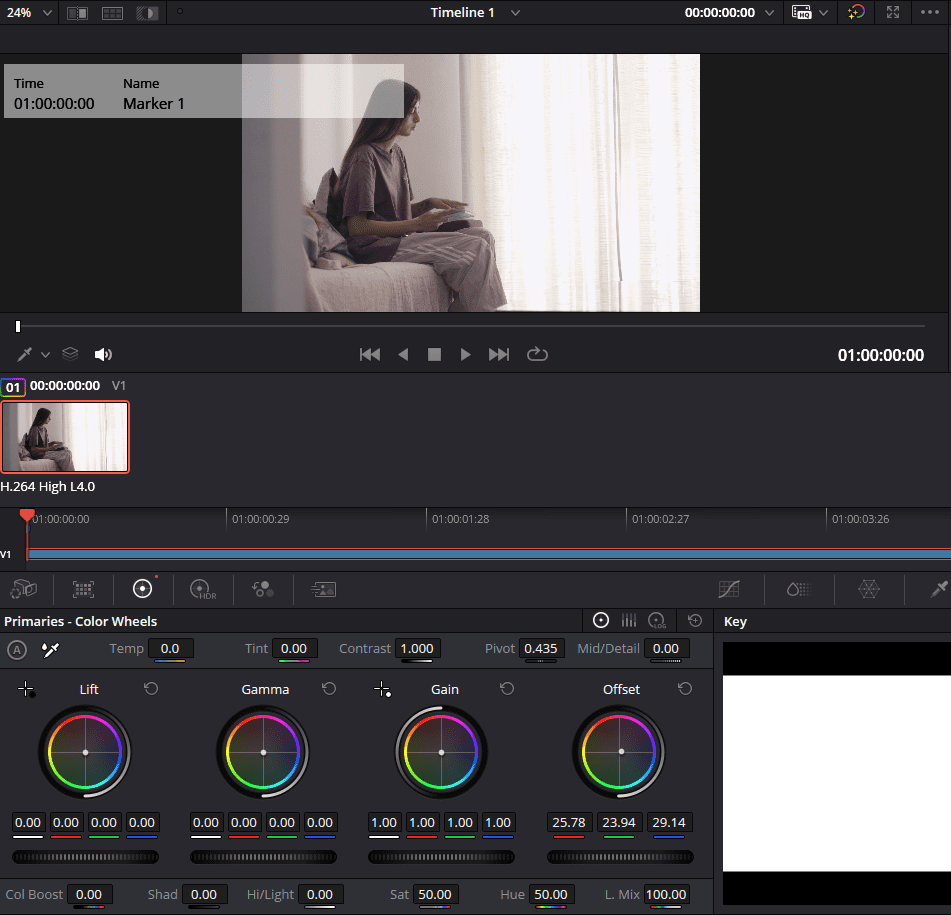
Select the circle in the center of the Offset wheel and move it in any direction. You’ll notice that the overall hue of your image shifts. If your image has a pink tint, moving it toward the green side will balance the colors. Play around until you’re happy with your white balance.
Step 5: Add contrast and saturation
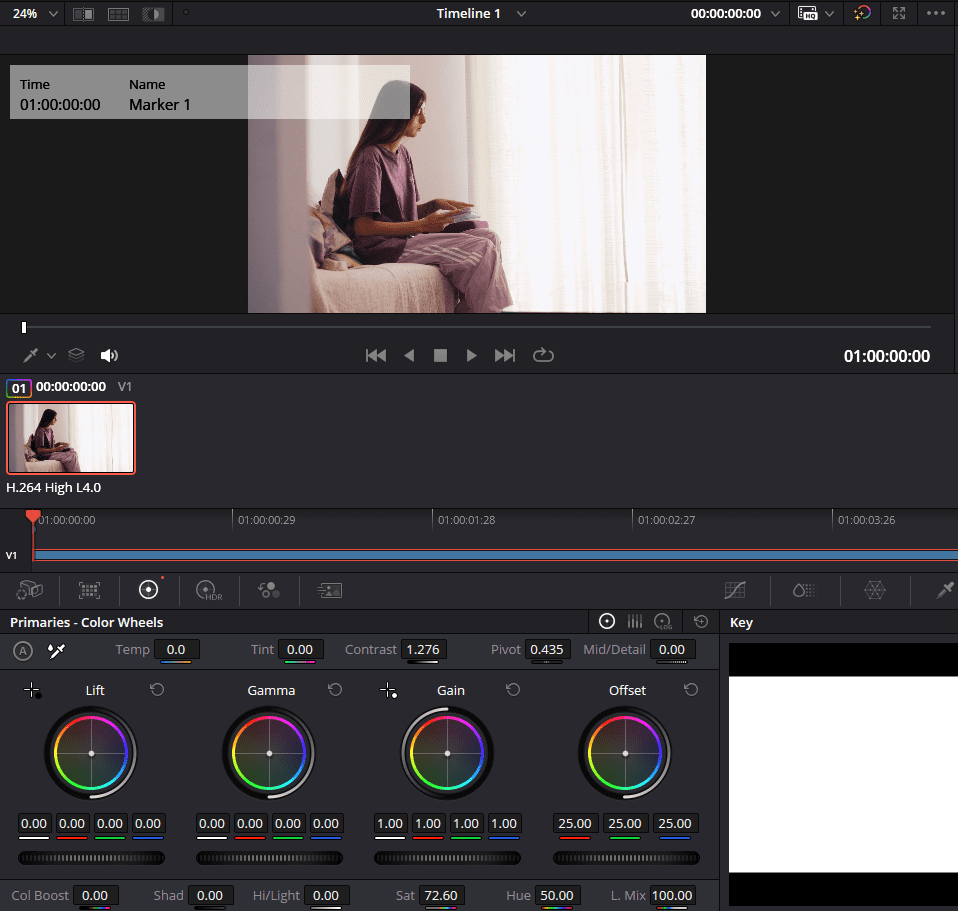
With that out of the way, you need to increase the contrast and saturation to bring life to your footage. Select Primaries – Color Wheels and change the Contrast and Saturation sliders until you like the result.
For targeted adjustments, you can use the Hue vs. Saturation curve. For example, if you want to increase the saturation of your blues, place two dots on either side of the blue color spectrum and drag the line upwards.
Step 6: Fine-tune the look
At this stage, you should have a solid starting point to grade your video and try to achieve the look you want. Here are some of the main color grading techniques and how to achieve them:
The “teal and orange” look
Teal and orange is a high-contrast complementary color scheme that emphasizes skin tones and is used in movies like Transformers and Mad Max: Fury Road. It’s characterized by teal shadows along with orange mid tones and highlights.
In the Color Wheels tab, push the shadows towards teal and the mid tones and highlights towards orange using the Lift and Gain wheels.
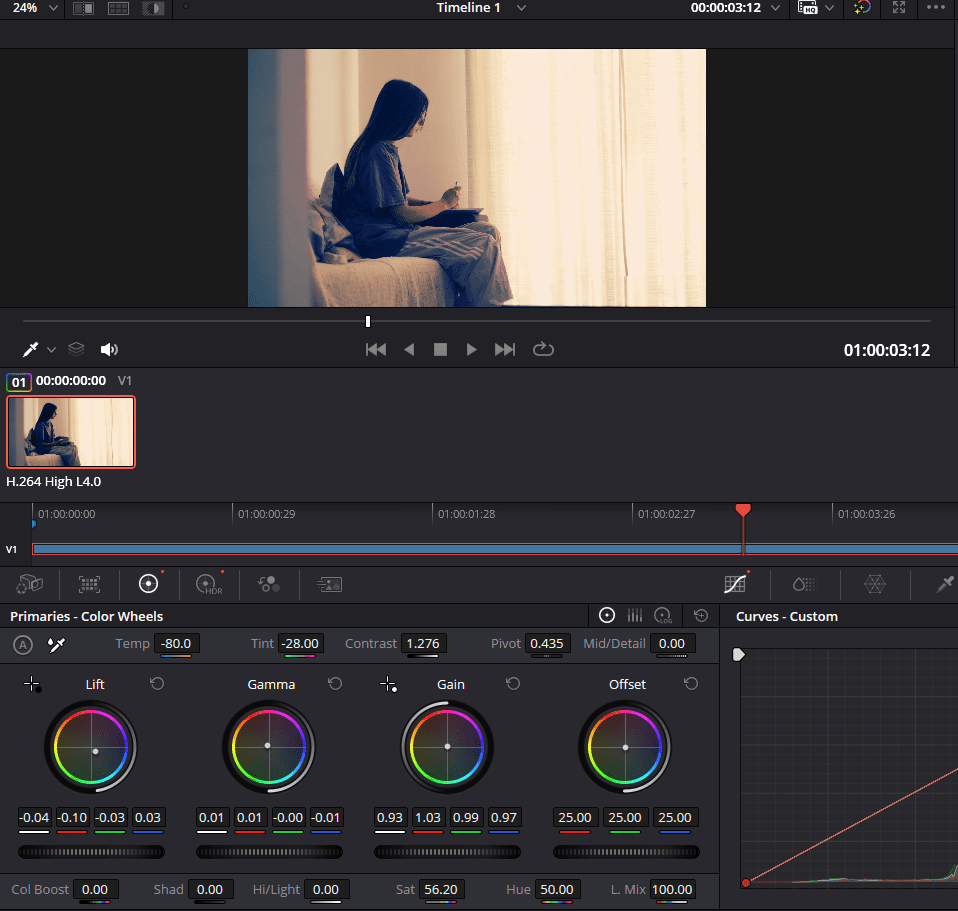
You can use the Hue vs. Hue curve to adjust the tones so that skin tones remain natural while the rest of the scene has a pleasing contrast.
Bleach bypass
Bleach bypass is another high-contrast but desaturated look that gives a gritty and dramatic atmosphere, as seen in Saving Private Ryan and Fight Club.
Lower the Saturation slider in the Color Wheels tab to reduce the color intensity. Increase the Contrast slider significantly to mimic the high-contrast look of the traditional bleach bypass process.
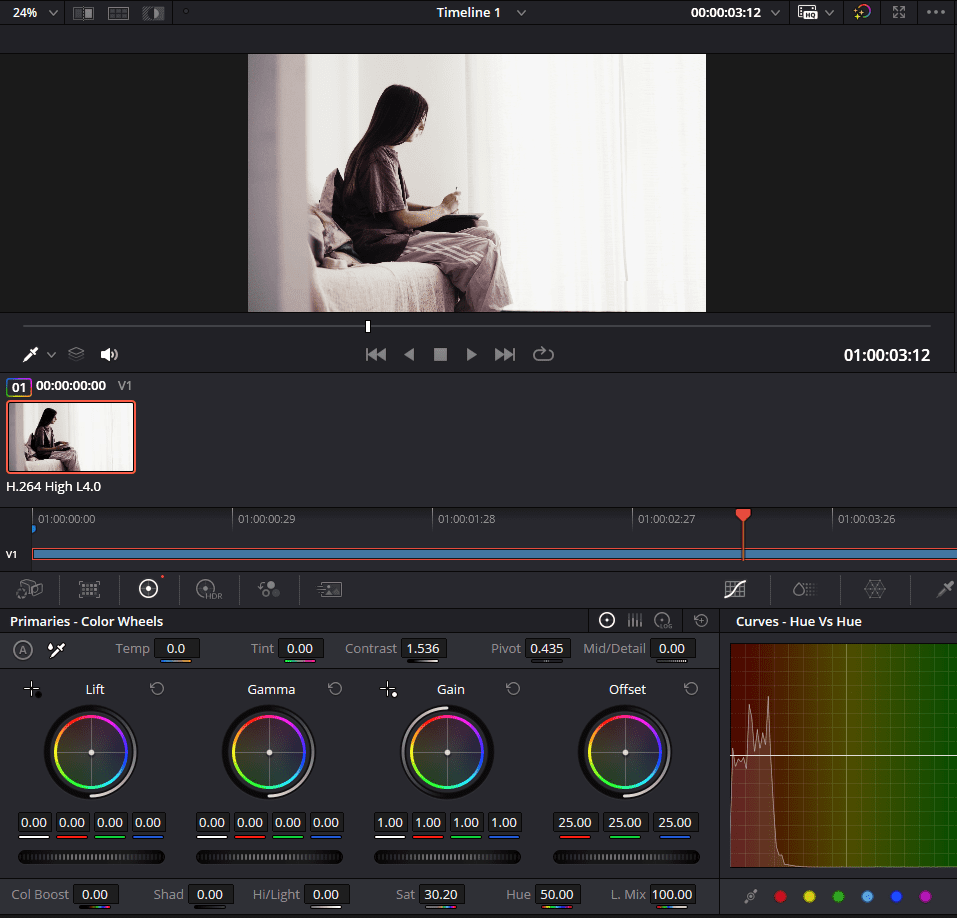
Add film grain using the Effects panel to further emulate the old film look.
Vintage or retro look
This nostalgic, warm-toned aesthetic has the feeling of old film stock. O Brother, Where Art Thou is a good example of this color grade.
Use your Color Wheels to add a slight yellow or orange sepia tint to the image, then reduce the contrast to simulate the muted look of old film.
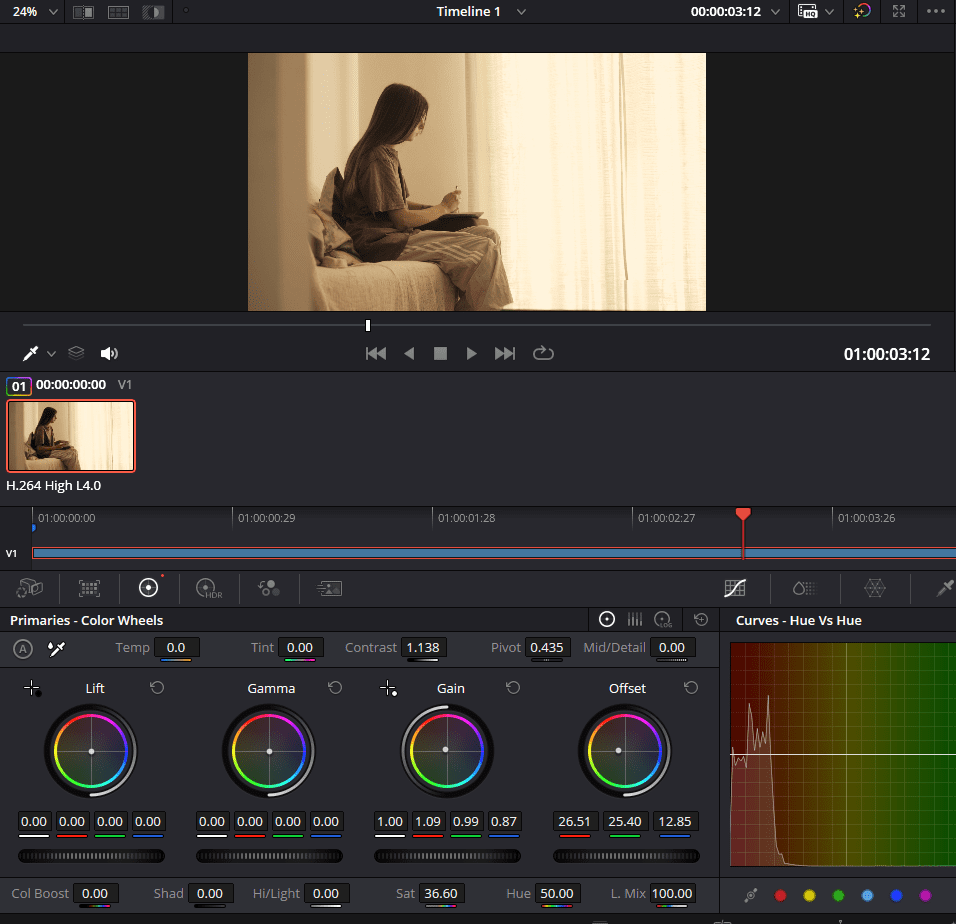
Add a vignette from the Effects panel to complete the look.
How to copy and paste a color grade in DaVinci Resolve
In the Color page, if you’ve already graded a clip, you can apply that same grade to other clips. Select the range of clips you want to apply the grade to, then hover your cursor over the original clip and press your scroll wheel down. A pop-up might appear asking if you want to replace the existing grades. Press Replace.
How to save a color grade in DaVinci Resolve
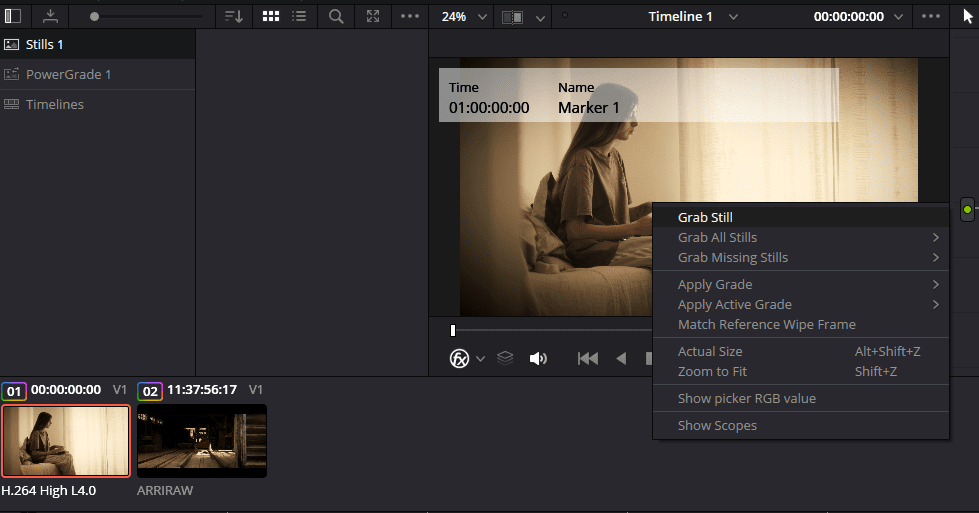
To save a color grade as a DaVinci Resolve color grading preset, select Gallery and open Stills Album. Select your color-graded clip, then right-click the video and select Grab Still. This will save a still of your clip with all of the color grading nodes still applied.
To apply this color grade to a new clip, select your clip and middle-click the still.
Work faster in DaVinci Resolve with templates
Mastering DaVinci Resolve color grading can help you transform raw footage into cinematic masterpieces. If you practice color grading with Resolve’s extensive toolset, you’ll achieve professional-quality results in no time. There are also plugins for DaVinci Resolve that can simplify the color grading process with presets and LUTs.
To help you work even faster, Storyblocks offers thousands of customizable templates for DaVinci Resolve, providing pre-made effects, transitions, motion graphics, LUTs, and more. Subscribe to Storyblocks for unlimited downloads of essential stock assets to accelerate your video creation process.