Want to give your videos that wow factor? Premiere Pro keyframes are the secret ingredient, letting you control motion, adjust effects, and create smooth transitions. And that’s just scratching the surface of what’s possible with these powerful tools.
Below, you’ll learn how to add keyframes in Premiere Pro to create more engaging videos than ever before. Let’s dive in.
Table of contents
What is a keyframe?
In Premiere Pro, keyframes are markers that indicate the start or end of a change in an attribute (like scale or opacity). They’re the points telling Premiere Pro where an effect should begin and end.
Imagine you have a video clip of a car driving down a road. If you wanted the clip to zoom in as the car moves forward, you’d set a keyframe at the starting point with 100% scale. Then, you’d set another keyframe later in the timeline with a larger scale. Premiere Pro will then animate the zoom effect between these two keyframes, making the car appear to come closer.
In this way, keyframes let you create smooth transitions and effects without manually adjusting the footage frame by frame. You can use them to change all sorts of properties, including positions, scale, rotation, and opacity, adding life and movement to your projects.
How to add a keyframe
If you’re new to editing with Premiere Pro, keyframes might seem complicated. But once you understand the basics of how they work, you’ll be able to perform all sorts of edits quickly and effectively. Here’s how to keyframe in Premiere Pro.
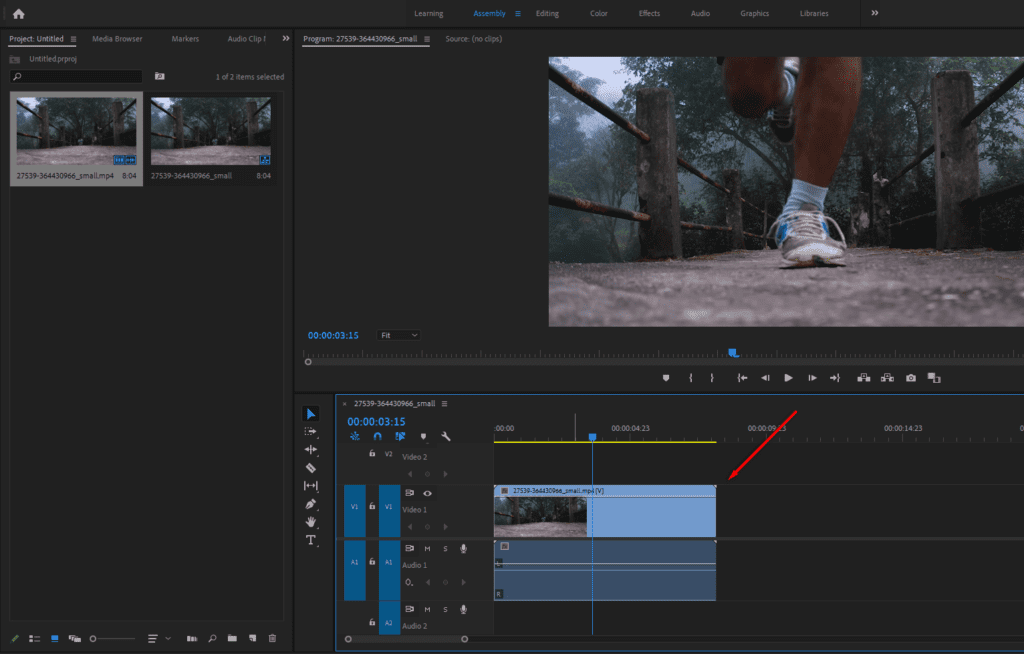
1. Select your clip
First, open Premiere Pro and import your video. Then, drag it to the Timeline.
2. Open the Effects Controls panel
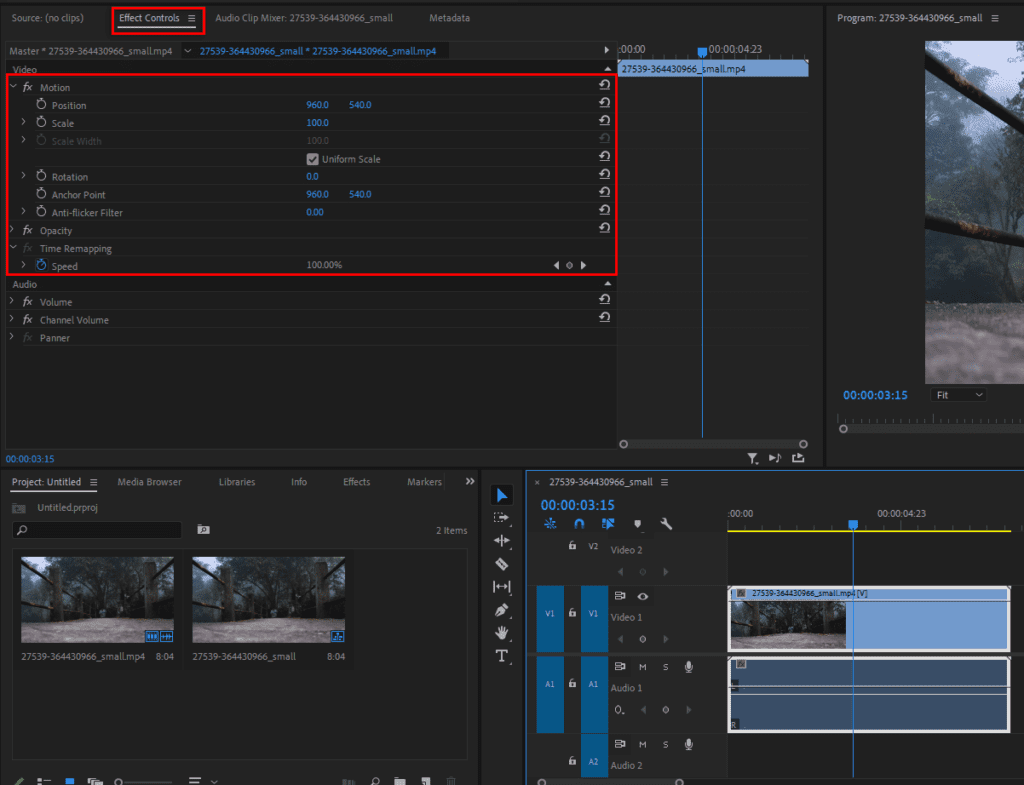
Click on the clip in the Timeline to select it. Next, go to the Effects Controls panel in the Edit tab. Decide which property you want to change, like Position, Scale, or Opacity. For this example, we’ll create a zoom effect using the scale property.
3. Add the first keyframe
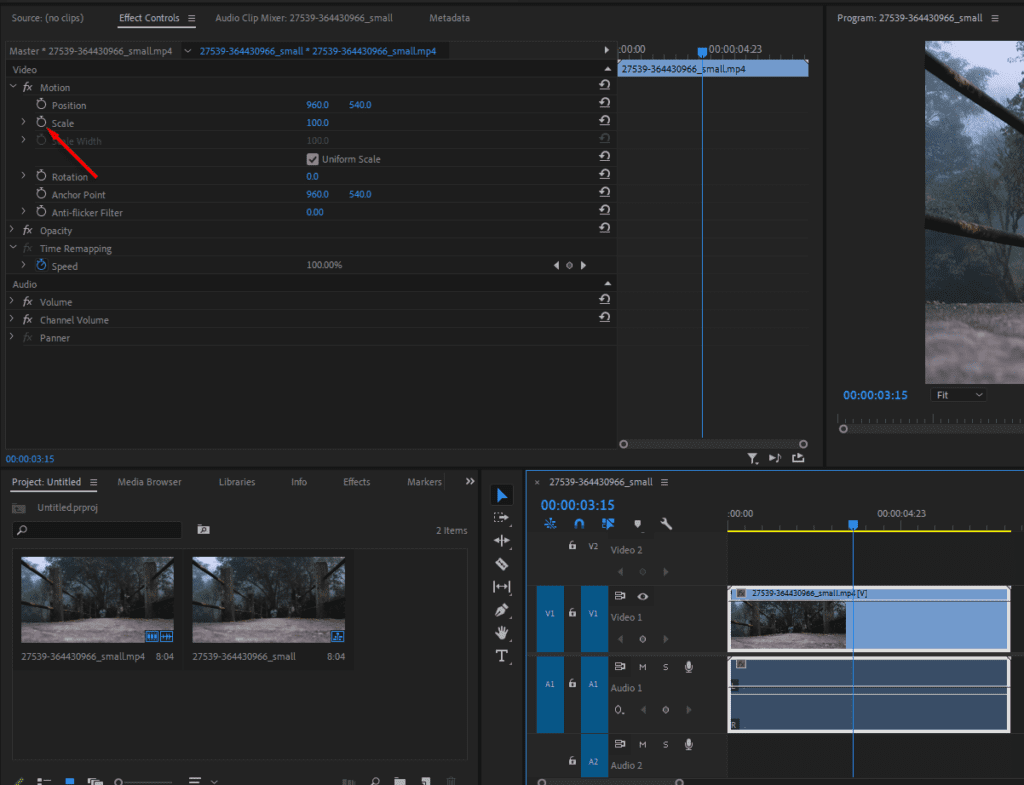
Once you know what you want to change, move the playhead to where you want the effect to start. Click the Stopwatch icon next to the property. This will add the first keyframe and tell Premiere Pro to start tracking changes from this point.
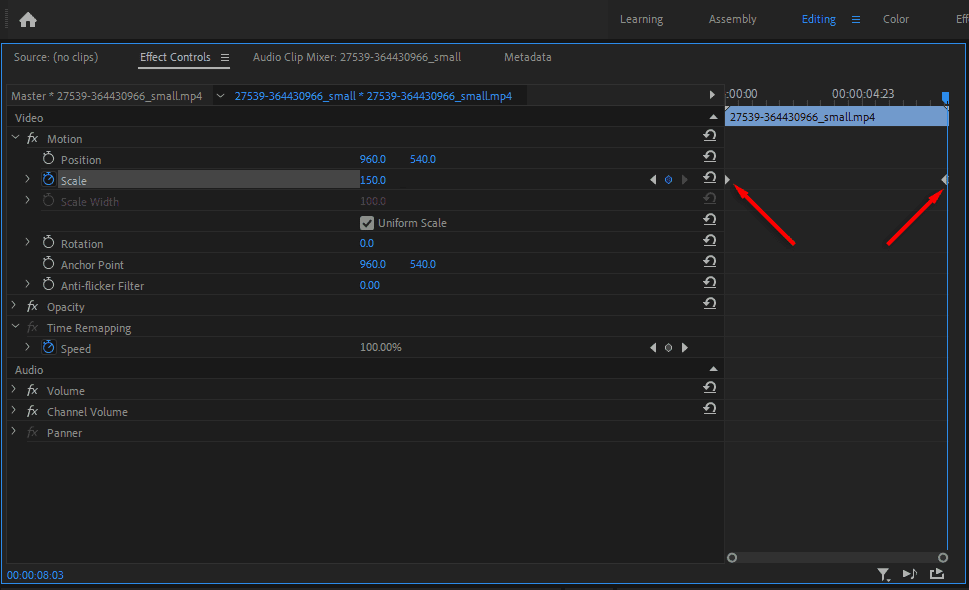
When you add a keyframe, you’ll notice a small diamond-shaped icon appear in the keyframe graph, highlighted in the screenshot below. To change the keyframes properties, you first have to select the keyframe here.
4. Move the playhead and change the property
Next, position the playhead to where you want the effect to end, then change the property. For example, we’ll change Scale from 100% to 150%, causing a significant zoom-in. Premiere Pro adds a second keyframe automatically.
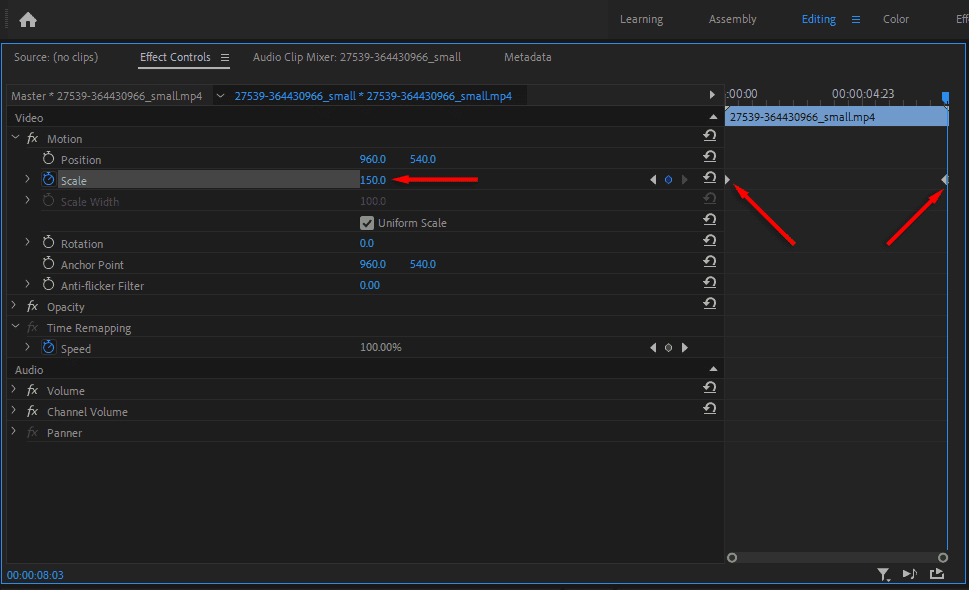
Remember: If you’ve toggled animations on (by pressing the Stopwatch icon), Premiere Pro adds keyframes automatically whenever you adjust a property’s value in the Effects Controls panel. If you forget to toggle animations on, changing the property’s value will affect the entire clip—not just the part between keyframes.
5. Review your animation
Play back your clip to see the transition between keyframes. You can fine-tune the position of the keyframes by clicking and dragging them to different spots. If you place keyframes in the wrong position or no longer need them, simply select them and press Delete on your keyboard to remove them.
How to use keyframes in Premiere Pro
Keyframes give you more precise control over creative effects and animations. They help you make your videos more dynamic, without needing to switch to a program like Adobe After Effects.
Here are some of the things you can do with keyframes:
- Create a freeze frame. Sometimes, pausing the action can add emphasis. To create a freeze frame, first move the playhead to the frame you want to pause on. Right-click the clip and select Add Frame Hold to freeze it. Finally, add keyframes to animate transitions into or out of the freeze, making the pause more stylistic.
- Add effects or animations to text. Animating text helps convey your message. Start by creating a text layer. In the Effect Controls panel, set keyframes for properties like position, opacity, or scale. Adjust these properties over time to make text move, fade in, or grow, creating engaging titles or callouts.
- Zoom in on a video. Zooming in draws viewers’ attention to specific details. To zoom in on a video, set keyframes for Scale at the beginning and end of your desired zoom range. Start with the normal scale value and increase it over time to smoothly zoom into your subject.
- Speed up a video. Need to convey action quickly? Create Time Remapping keyframes where you want to speed up your video. In the Timeline, right-click your video and press Show Clip Keyframes > Time Remapping > Speed. Drag the line between these keyframes higher to increase the speed.
- Fade a video. Fading smooths the transition between scenes. In Effect Controls, set keyframes for Opacity. Start at 100% and gradually reduce to 0% to create a fade-out, or start at 0% and increase to 100% for a fade-in.
- Pan across a scene. Panning adds motion to static shots. Set keyframes for Position at the start and end of your pan. Adjust the position values to create a horizontal or vertical pan, giving your scenes a sense of movement.
Conclusion
Keyframes are your gateway to more engaging videos with Premiere Pro. When you master keyframes, you can animate text, transform scenes, and easily perfect the timing of effects or transitions.
If you’re looking to save time and spark creativity, Storyblocks offers a vast library of Premiere Pro templates, effects, and transitions, along with a plugin for Adobe Creative Cloud that lets you bring their library of over 8 million royalty free stock assets right into your editor to save you valuable time. Sign up for Storyblocks today and get unlimited downloads of 4K footage, Premiere Pro templates, music tracks, images, and more.


