DaVinci Resolve is more than just editing software or a color grading suite. It’s an all-encompassing creative solution for every step of the creative process when it comes to video. With the release of DaVinci Resolve 15 in 2018, Blackmagic also integrated a lite version of Fusion into Resolve, a node-based compositing software.
The Fusion page might be the most complex page found within DaVinci Resolve, but we’re here to help you get started in understanding it. This tutorial will walk you through the process of a VFX staple in Fusion: compositing a background element into a filmed scene.
Table of contents
Comparing After Effects vs DaVinci Resolve Fusion
Before we dive into the tutorial, let’s first cover an important topic if you’re entirely new to Fusion: how it compares to After Effects. After all, many editors have made their way from Premiere Pro to DaVinci Resolve. As a result, most editors are familiar with Adobe’s compositor, After Effects.
And thanks to the wide selection of After Effects tutorials on YouTube (like our recent rotoscoping tutorial), learning After Effects has been relatively approachable outside of the subscription cost. Below is a high-level summary – for a full breakdown of DaVinci Resolve vs After Effects, check out our dedicated article.
Different editing layouts and structures
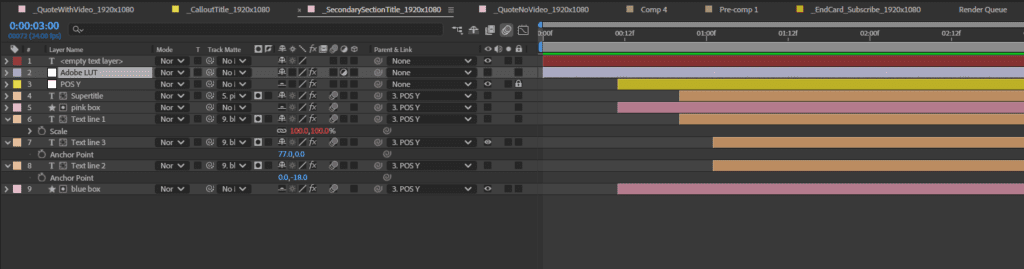
While they share similarities, how you compose differs significantly. After Effects works similarly to how we see our video edits on the edit page: in layers.
This means each image element is stacked on the others and displayed in descending order. Visually and practically, this makes the most sense.
The layer structure is ideal for motion design and animation, as it lets you assess graphical elements in a way that echoes traditional animation workflows. The visual nature of layers often plays in your favor, much like animators flipping back and forth between individual animation cells.
Fusion, however, operates with a node-based compositing (NBC) system. At first glance, a completed flow graph might have you longing for the simplicity of the layer stack in After Effects.
With layers, what’s in your timeline and where that content sits in your composition is immediately apparent. But once you get the hang of reading a node flowchart, which you will in just a moment, it all starts to make a lot more sense, and may even feel more intuitive than After Effects.
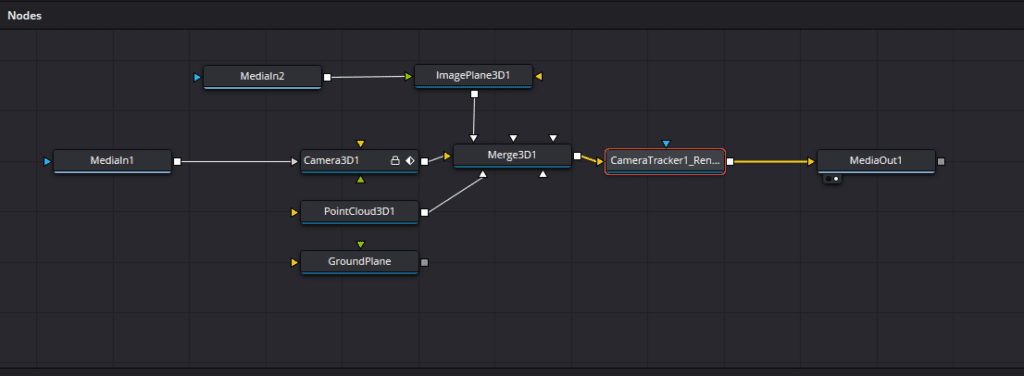
While After Effects presents your project vertically in a stacked layout, Fusion’s NBC reads horizontally, left to right, from your input node to your output node. If you apply a single effect, the node flow remains clean and easy to follow. But as soon as you add multiple effects and transform properties, it can resemble a technical schematic, and that’s where most people begin to check out. Still, the key thing to understand is that every node is a separate operation.
A node could be a thumbnail representing your clip from the edit page, a compositing function, or an individual tool like a glow effect. Unlike After Effects, where you simply stack layers, Fusion lets you connect nodes from input to output. The way you link these nodes determines how your media is processed.
Compositing a 2D Element in 3D Space with Fusion
Now that you have a bit of a primer on how Fusion works, let’s look at how we would composite a background element into a moving shot within Fusion.
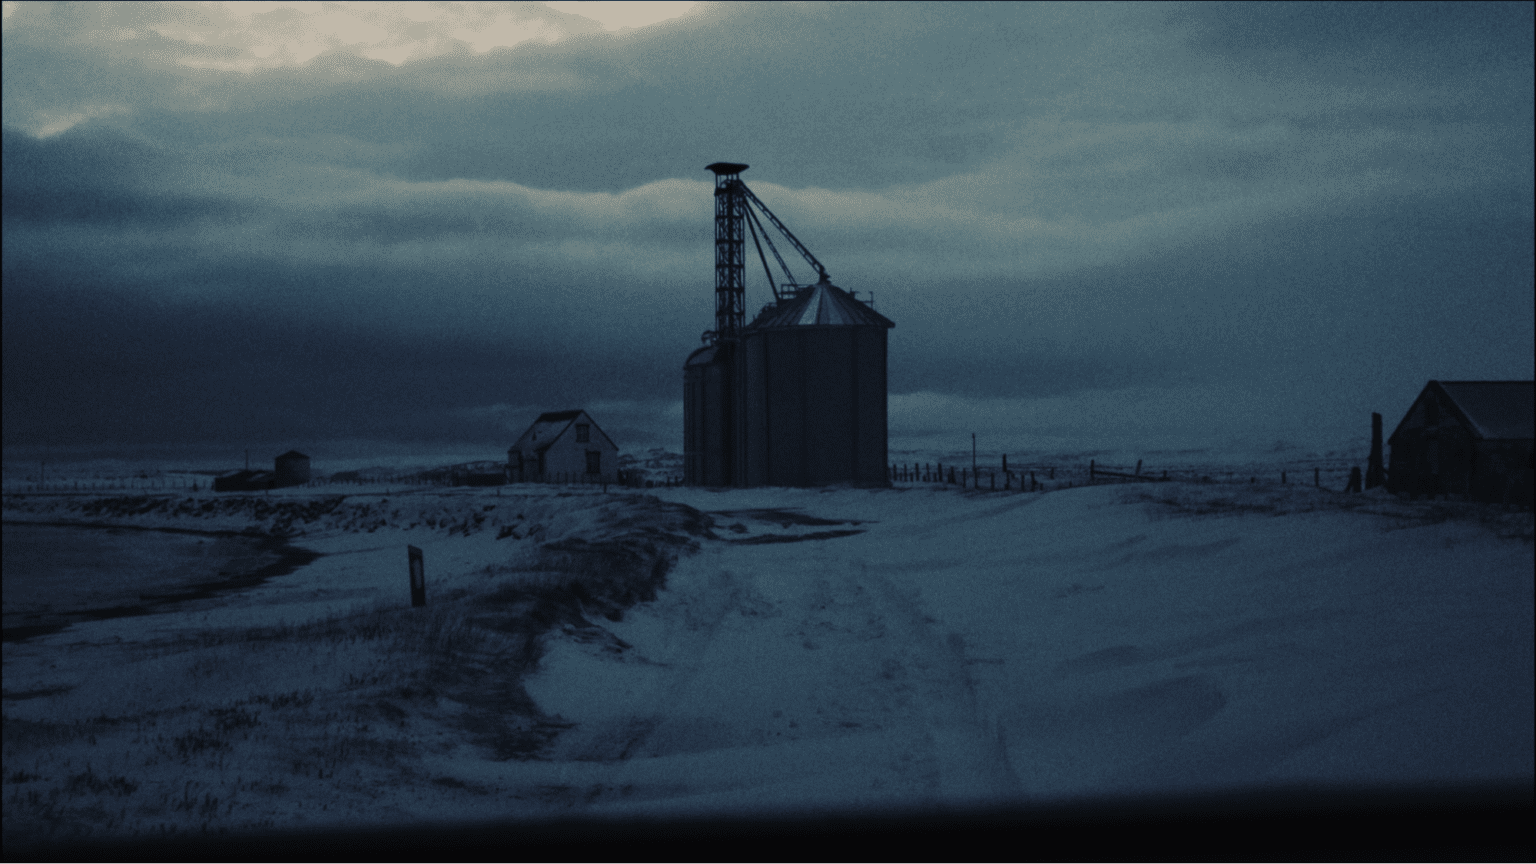
We’ve pulled this beautiful rural snowy landscape from the Storyblocks library. It’s a handheld shot moving forward from inside a vehicle, which makes it fairly complex to composite.
But our hypothetical director insists on adding a grain silo in the middle of the frame to give the scene more character. We don’t quite agree, but hey, he’s the director, so let’s make it happen.
Before we get going, make sure your background element is a PNG. If not, open it in Photoshop, convert it, and bring it into your media pool.
1. Select your clip and turn on Camera Tracker
First, on the edit page, select the clip you’ll be compositing onto, and with it selected, head over to the Fusion tab.
Right now, the fusion page will look like this.
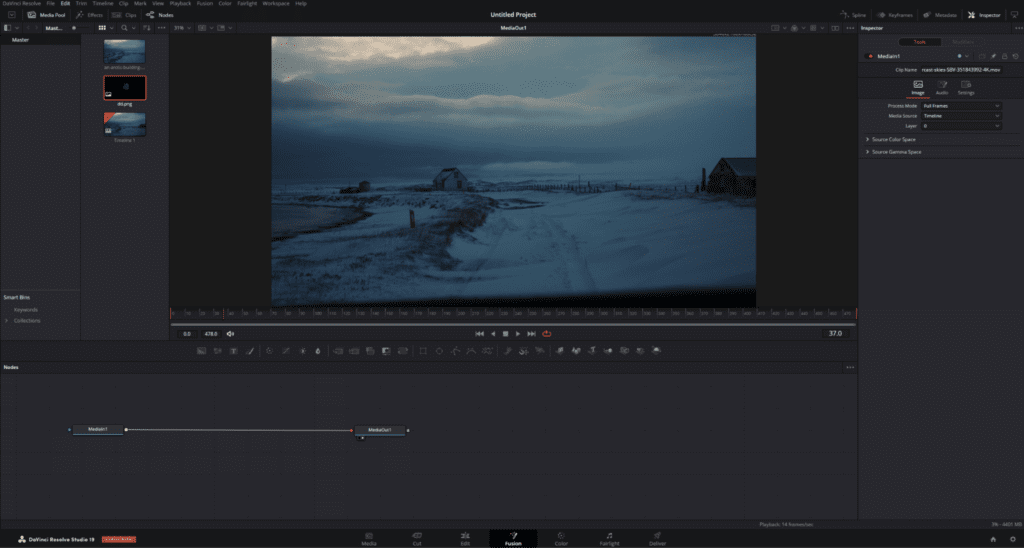
With the Media In node selected, hit Shift + Spacebar and search for Camera Tracker. You can also find this within the tools sidebar, but the keyboard shortcut saves time. We’ll use this tool to track the camera’s movement.
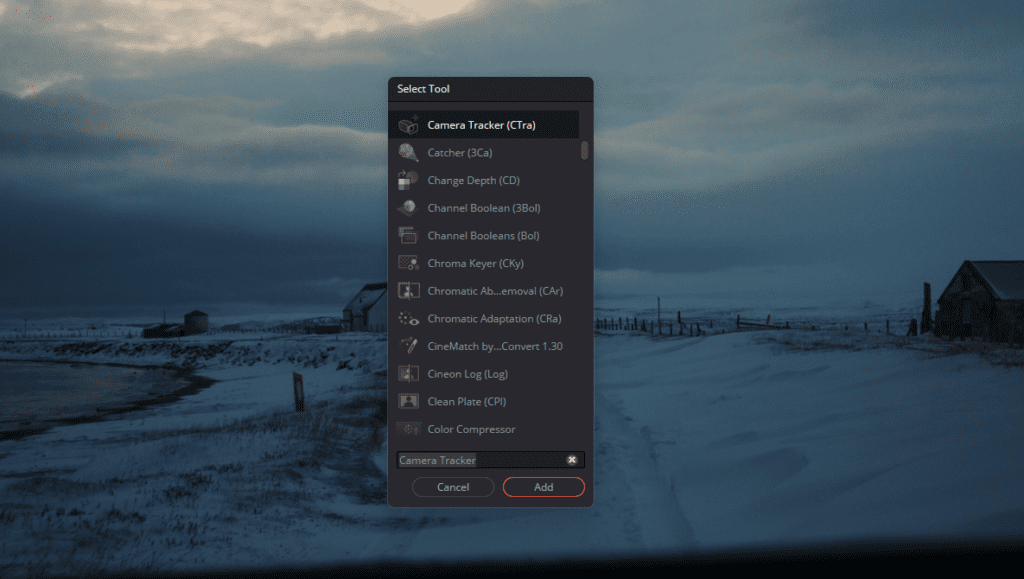
Selecting the camera tracker is essential, as it generates a virtual camera in 3D space. If we used the normal tracker, which is also found on the color page, we’d be just tracking a 2D point, which does not work well for compositing.
2. Adjust camera tracking settings
Next, go to the tracker and open the Inspector in the top right corner.
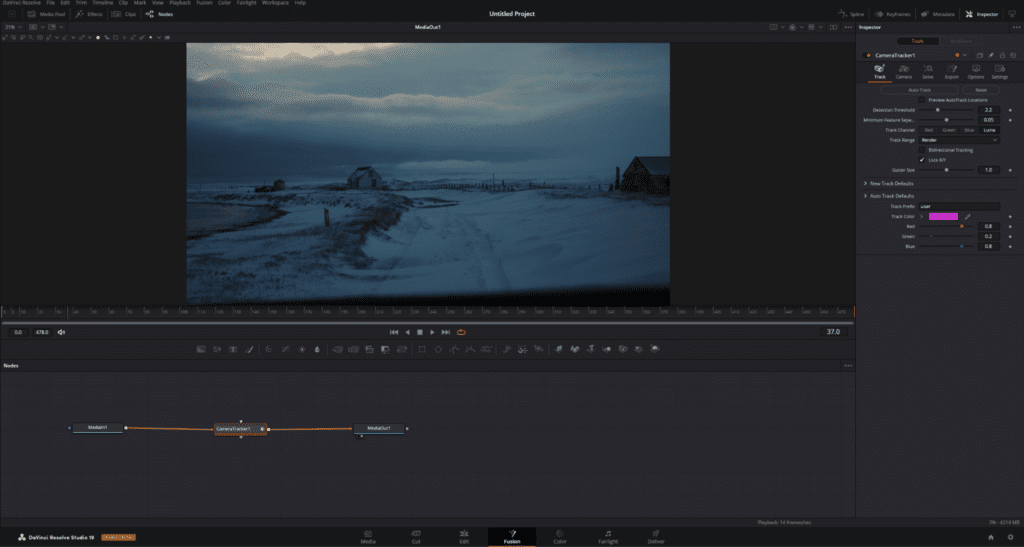
The 3D camera tracking is so robust that we can leave most settings as is. However, we can turn on Preview Auto Track Locations to see the tracking points to ensure there are no issues, and we can also lower the Minimum Feature Separation, which will give us more tracking points.
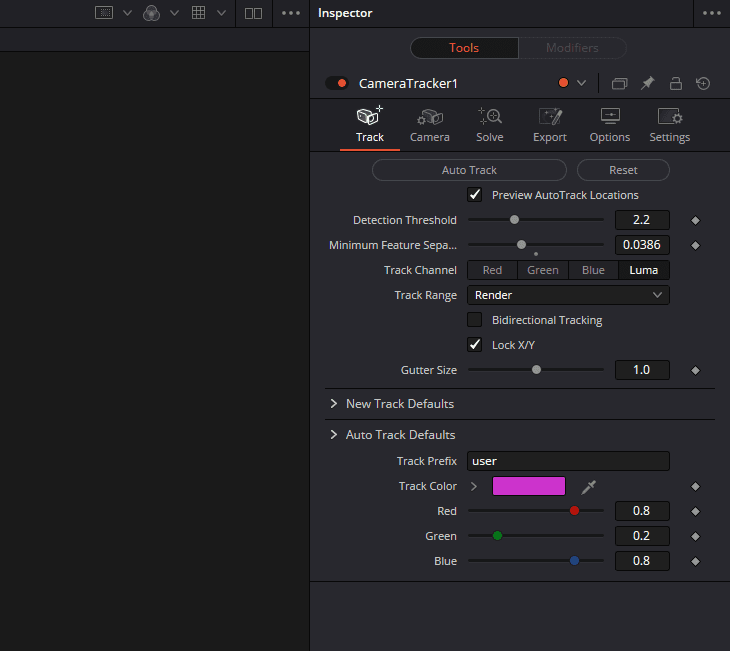
Then hit Auto Track and let Resolve handle the rest.
3. Solve and adjust for the Average Solve Error as needed
Next, go to the Solve tab and hit Solve. Ideally, we want the Average Solve Error to be under 1.

If it’s above 1, we must remove some tracking points. To do that, first set Solve Weight to zero and click Set. Then adjust the three sliders to isolate the points you want to remove and hit Delete.
However, we don’t want to delete too many points. If you run into this issue, start with a few points and maybe lower the Max Error slider. Once this is done, try solving again. The goal is to land under that threshold.
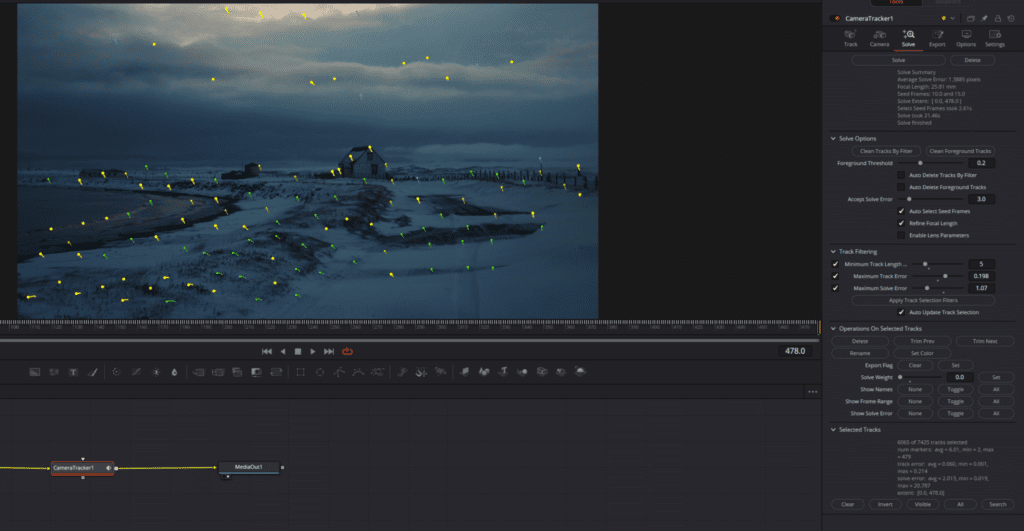
The foundation of the footage will dictate how well Fusion solves your scene. Overtly shaky footage with motion blur won’t render many trackable points.
4. Export your work
Once done, go to the Export tab within the Inspector and hit Export. Resolve will now add a bunch of extra nodes to our node graph. However, we don’t need them all. We only want to extract the camera movement data because we’re just adding a 2D element into the background.
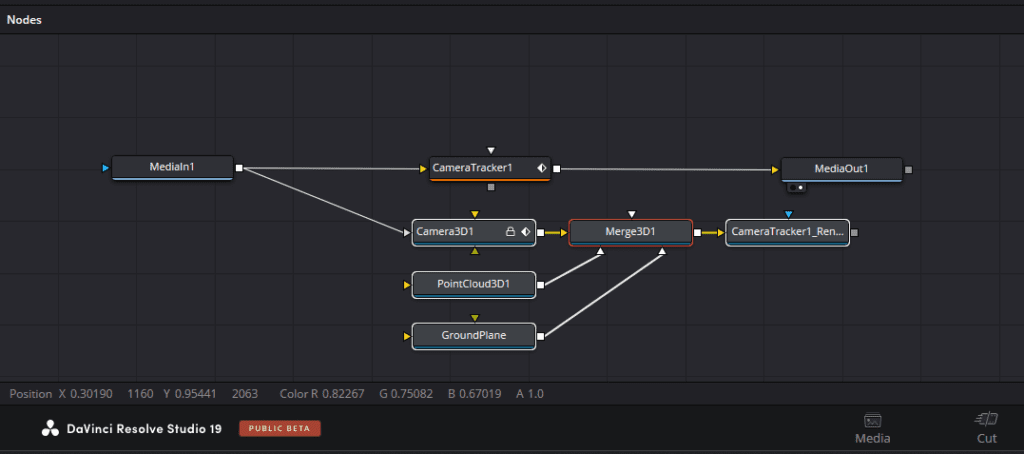
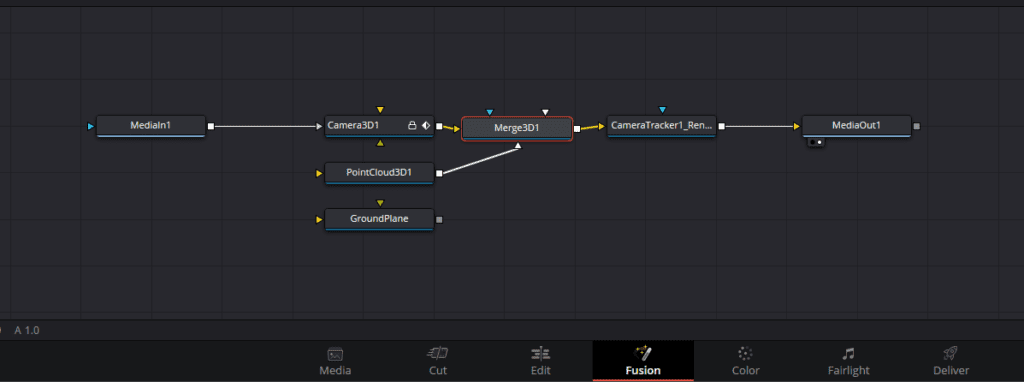
Therefore, we can start by disconnecting and removing the Ground Plane node (as this leaves an unwanted visual element on screen). Then, we can delete the initial Camera Tracker node.
This new collection of nodes will be added between MediaIn1 and MediaIn2, like this:
5. Add your element into your scene
Now we need to add our element to the scene. To do this, add an Image Plane 3D node, which is done so by this icon:
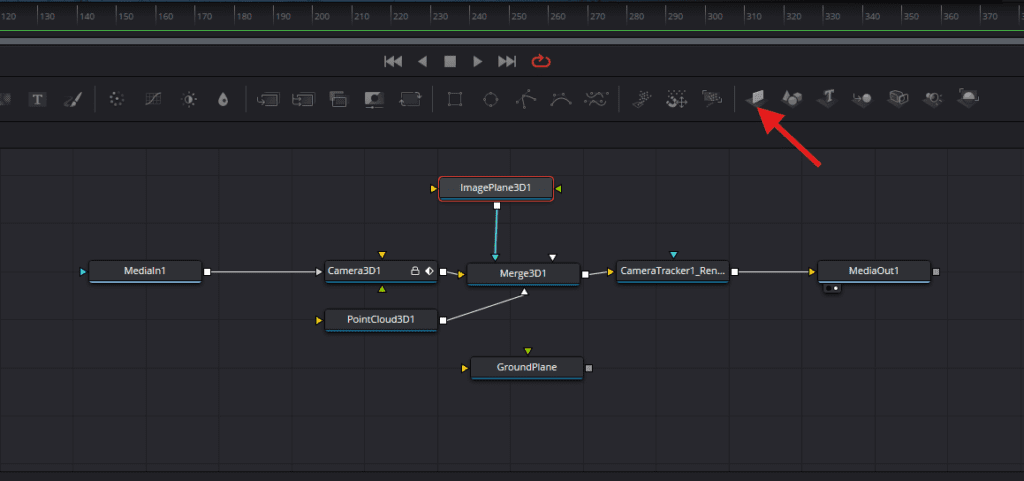
Then, bring your image into the Fusion node graph from the media pool. This will create a new Media node. We need to connect the media node to the Image Plane 3D node from here.
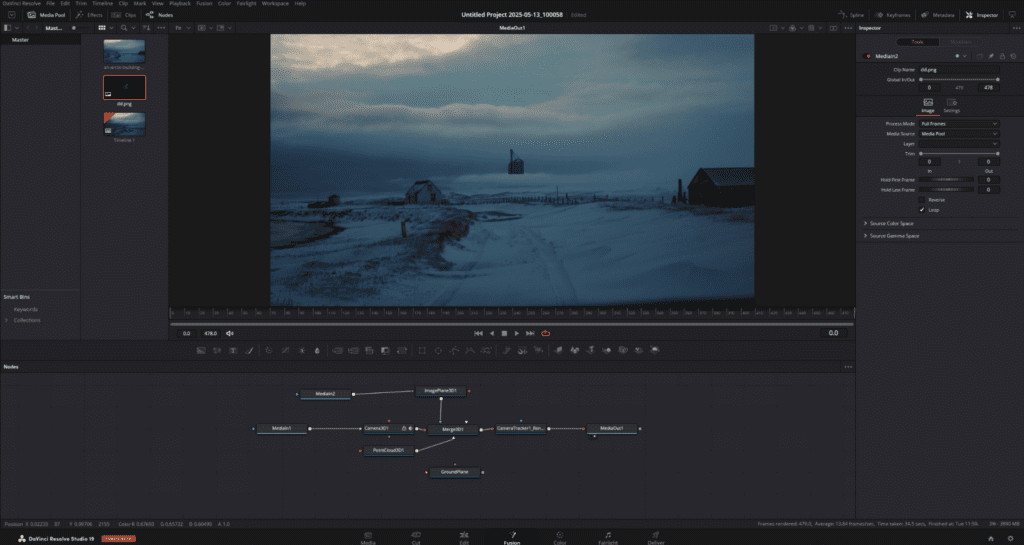
If you need to adjust its properties, such as the scale and transform, select the Image Plane 3D node, go to Transform within the Inspector tab, and change the scale and position.
6. Add blur (optional)
If you have depth in the field, we may need to add some blur to this object. To do that, select the MediaIn2 node, hit Shift + Spacebar, search for Blur, and adjust accordingly.
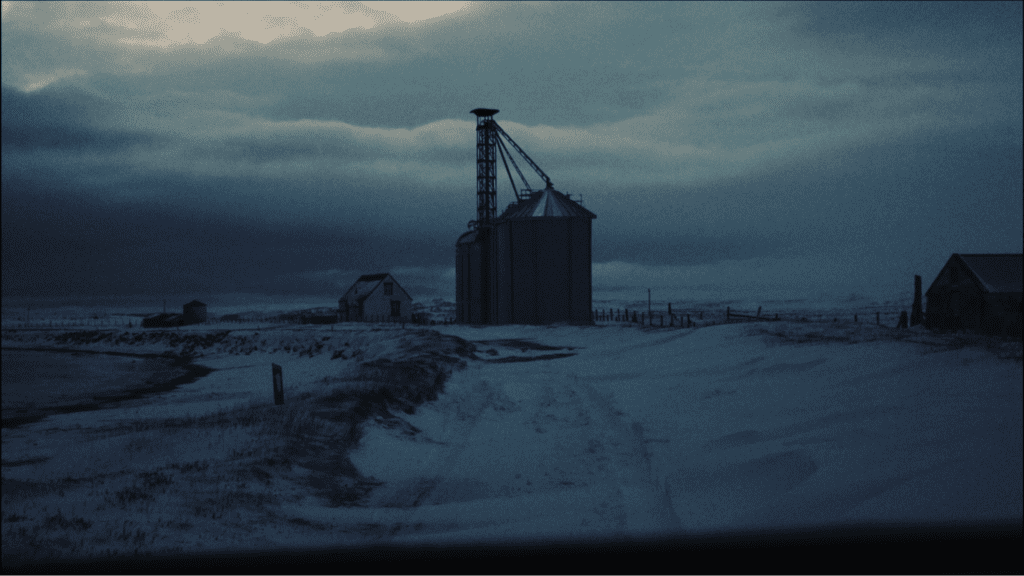
When we hit play, we should have a realistic-looking composited element in our scene. Of course, the full extent of realism will depend on how well the 2D element has been created, but here, it’s looking good.
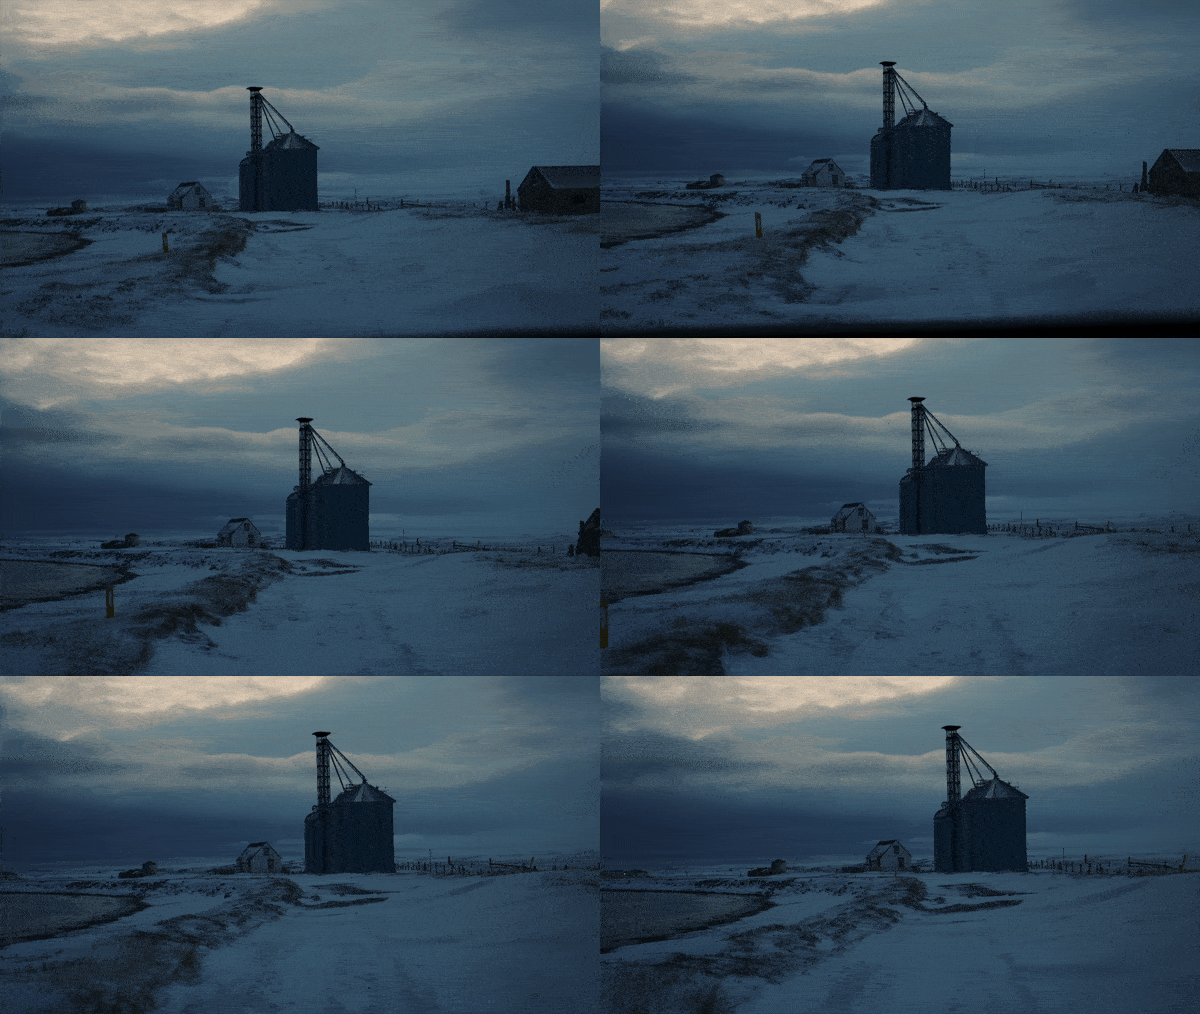
Following these steps is an excellent way to include background elements, set extensions, and matte paintings into a shot. As seen in our example, The camera is relatively shaky, but Resolve’s excellent camera tracker is able to position the 2D element securely, so it looks very realistic, especially the increase in scale as the camera drives closer to the silo.
However, what if there is a person in the frame crossing the background element, or we have cars or other similar objects passing through the frame, which is going to wreak some havoc with the tracking points? In this instance, Joris Hermans has a pretty efficient DIY method of using the magic mask in DaVinci Resolve to help with that.
You can follow his tutorial below for instances where something enters the frame and throws off the tracking data.
In Summary
Alright, that was quite a few steps. Here’s a summary of everything we just covered.
Prepare your background element:
- Ensure it’s a PNG.
- If not, convert it in Photoshop.
- Import it into your media pool in DaVinci Resolve.
Select your video clip on the Edit page:
- With it selected, go to the Fusion page.
On the Fusion page:
- Make sure the Media In node is selected.
- Press Shift + Spacebar and search for Camera Tracker.
- Alternatively, locate it in the Tools sidebar.
Track the camera:
- Select Camera Tracker (essential for 3D camera data).
- Open the Inspector panel.
- Turn on Preview Auto Track Locations.
- Adjust Minimum Feature Separation to get more tracking points.
- Click Auto Track and let it process.
Solve the track:
- Go to the Solve tab, click Solve.
- Ensure Average Solve Error is under 1.
- If above 1:
- Set Solve Weight to 0, click Set.
- Adjust the sliders to isolate problem points.
- Click Delete.
- Don’t remove too many; aim for minor cleanup.
- Click Solve again.
- Set Solve Weight to 0, click Set.
Export the camera data:
- Go to the Export tab in the Inspector.
- Click Export
- Delete unnecessary nodes:
- Disconnect and delete the Ground Plane node.
- Delete the original Camera Tracker node.
- Disconnect and delete the Ground Plane node.
Add your 2D element:
- Insert an Image Plane 3D node via the icon.
- Drag your PNG from the media pool into the node graph.
- Connect the new Media node to the Image Plane 3D node.
Adjust element properties:
- Select the Image Plane 3D node.
- Adjust Scale and Position in the Inspector’s Transform tab.
Finally, add blur if needed (for depth of field):
- Select the MediaIn2 node.
- Hit Shift + Spacebar, search for Blur, and apply it.
Learn DaVinci Resolve Fusion with templates from Storyblocks
I won’t lie – Fusion can feel like learning a foreign language. Especially if you’re used to After Effects and its layer-based compositing system. Just looking at Fusion’s dashboard and poking around won’t get you very far.
If you’re feeling intimidated or frustrated by learning Fusion, there’s a shortcut: the advanced DaVinci Resolve templates available in the Storyblocks library.
One of the more practical elements of working with these templates is that you can see how the template was built within the Fusion page. And by exploring these templates, you can learn to reverse engineer what the motion graphic designer did to create it.
Separating a motion graphic template into pieces is a good way to understand how it was created and can strengthen your knowledge of the software. To learn how to install fusion templates, you can follow the steps in this tutorial at 4:28.
If you need something even quicker, you can also download various pre-made graphics that you can drop into DaVinci Resolve without opening Fusion. From explosions and fire to cartoon snowflakes and liquid motion elements. These packs are fully built out for Resolve, so it’s just a case of dragging them in and tweaking to taste. To get unlimited downloads of templates for DaVinci Resolve, high-quality footage, music, images, and more, sign up for a Storyblocks subscription today.


