Since the 2000s, consumer and prosumer cameras have consistently improved in quality and decreased in size. However, the reduction in size also means a reduction in weight. With less mass to counteract and absorb user-induced motion, handheld footage becomes much more susceptible to camera shake and micro jitters.
It doesn’t matter how effectively they’re used in action flicks; for standard content, camera shake can make your footage look amateur. Thankfully, DaVinci Resolve has some incredibly powerful stabilization tools available. We outline exactly how to do this in the video tutorial below, or you can keep reading to follow along with the written tutorial.
Two important notes about stabilization
Before we dive into Resolve, there are two essential things to keep in mind:
1. Stabilization is not a magic fix for extremely shaky footage
It is meant to smooth out minor unwanted movements or remove judder from shots intended to be steady. If you are running with a handheld mirrorless camera, stabilization will not suddenly make your footage look like it was shot on a gimbal.
2. Frame your shots wider if you plan to use stabilization in post
If you know you will likely need stabilization while filming, framing your shots a little wider than usual is smart. Stabilization naturally crops into your footage to correct the motion, so giving yourself extra room helps preserve your final composition. Additionally, I recommend watching this tutorial. It outlines some techniques for walking with a camera handheld to reduce the bouncing motion we create while walking naturally. You’ll get much better results when you pair this with a stabilization tool in editing software.
How to stabilize video in DaVinci Resolve
Stabilizing on the Edit page
First we’ll go over stabilizing footage on the Edit page. You can also stabilize through the Color page, but more on that later.
1. Select your clip and turn on stabilization
First, highlight the clip you want to stabilize. Then, go to the top right and open the Inspector. Halfway down on the right-hand side, you’ll see Stabilization. Click that to open the menu and. click Stabilize to turn it on.
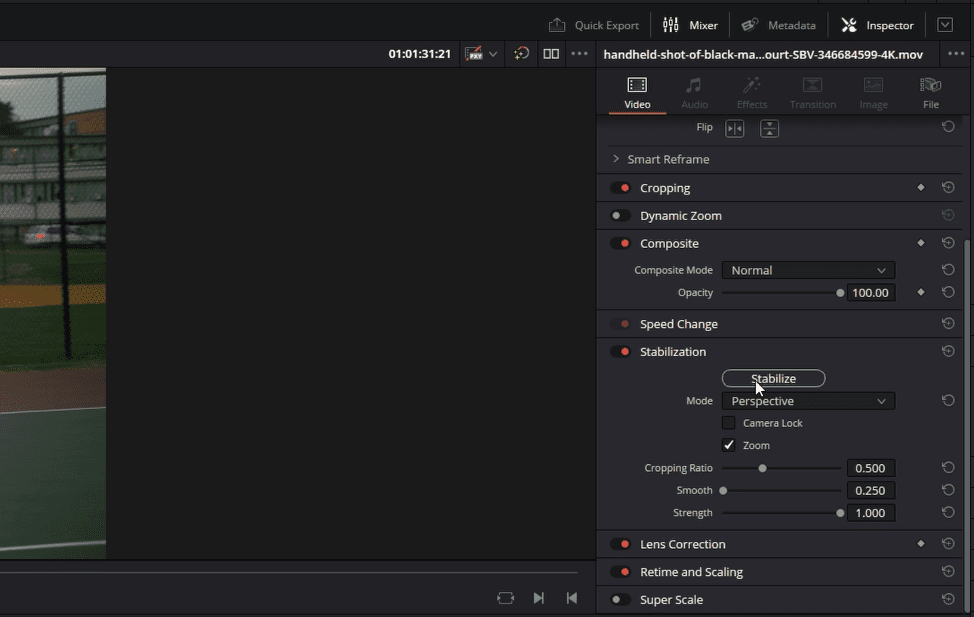
Once you do that, DaVinci Resolve will analyze the footage to work out its movement and then start to stabilize the video.
It’s important to note that stabilizing the movement of your video means reducing handheld motion and shakes. It won’t necessarily make a walking shot with a visible bounce look like it’s been filmed with a dolly or gimbal, and again, the prep tips we mentioned at the start of the article can go a long way in ensuring the stabilization works better.
2. Check the results and make adjustments to parameters
With default settings alone (you can see the results in the video tutorial), it’s done a good job stabilizing my footage in seconds. However, the results aren’t as good in the second clip example.
The stabilization is producing too much jello. In video footage, “jello” from Warp Stabilizer refers to a wobbly, distorted visual artifact that causes parts of the image to bend, ripple, or wobble unnaturally during stabilization. In this instance, we must use adjustable parameters to fine-tune the effect.
Stabilization mode options
Within the stabilization menu, three modes change how the stabilization is processed. By default, it’s set to Perspective, but there are two additional options: Similarity and Translation.
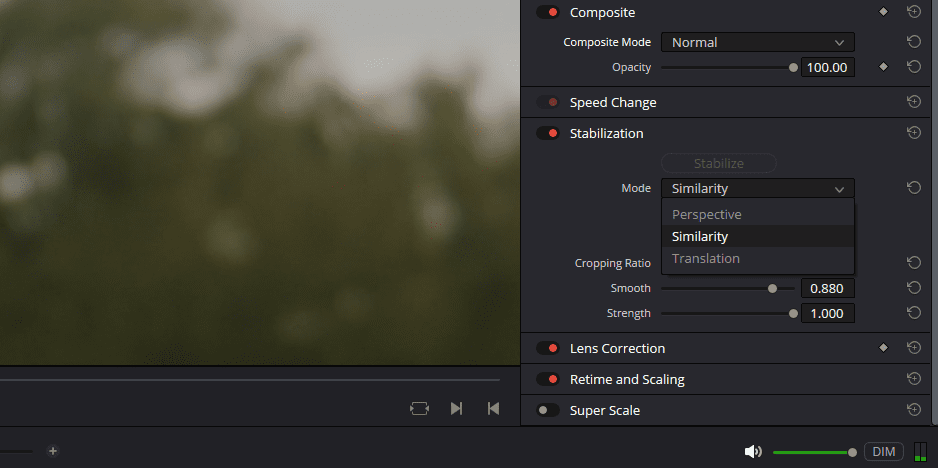
- Perspective analyzes pan, tilt, zoom, and rotation to stabilize the video while maintaining the perspective. Use this setting when you are physically moving the camera.
- If you see unwanted jello motion artifacts, try switching to Similarity. This mode manipulates the footage to cancel out the jello effect.
- If the unwanted motion you’re dealing with is just pan and tilt jitters, switch to Translation. This is best for small, linear movements.
Note: A few select Blackmagic cameras can unlock a hidden method for stabilization called Gyro. This lets you extract the movement data directly from the camera while filming. In this instance, the stabilization software isn’t solely analyzing pixel data; it’s accurately reading how the camera was physically moving during, which should provide better stabilization results in most cases.
Additional settings and parameters
Underneath the Mode dropdown, there are also two checkboxes and three sliders that can further refine your stabilization.
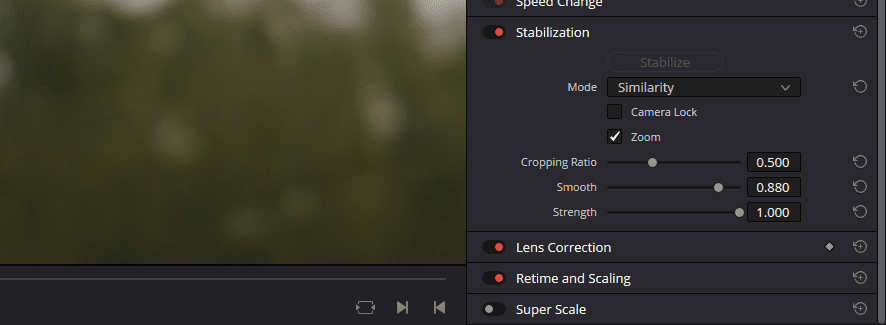
Checkboxes:
- Camera Lock – Select this to remove all motion from the shot. This is best when the intention is an entirely static shot.
- Zoom – This tells DaVinci Resolve, “Yes, it’s okay to zoom into the shot to hide movement near the outside edges of the frame.”
- Leave this ON by default.
- Only turn it off if a visual effects artist needs the entire frame.
- Leave this ON by default.
Sliders:
- Cropping Ratio—This is directly related to the Zoom function. It tells Resolve how much you’re okay with cropping once the footage has been stabilized.
- Smooth—Tells Resolve to smooth the motion even further, giving it a gimbal-like feel instead of natural handheld movement.
- Strength – Controls the overall intensity of the stabilization. Use this to retain slight handheld motion, but clean up the jitteriness.
Resolve’s stabilization can deliver fantastic results with the default settings after simply hitting Stabilize. However, the settings above allow you to fine-tune the effect. We can’t provide exact values, as every piece of footage is different; you’ll need to adjust each setting incrementally until you find what works best for your clip.
Stabilization on the Color page
You can also apply stabilization on the color page. To do so, find the Tracker panel in the center column (yellow arrow). This is usually where you’d track Power Windows, but clicking this camera icon with a wobble effect (red arrow) brings up the stabilization tools.
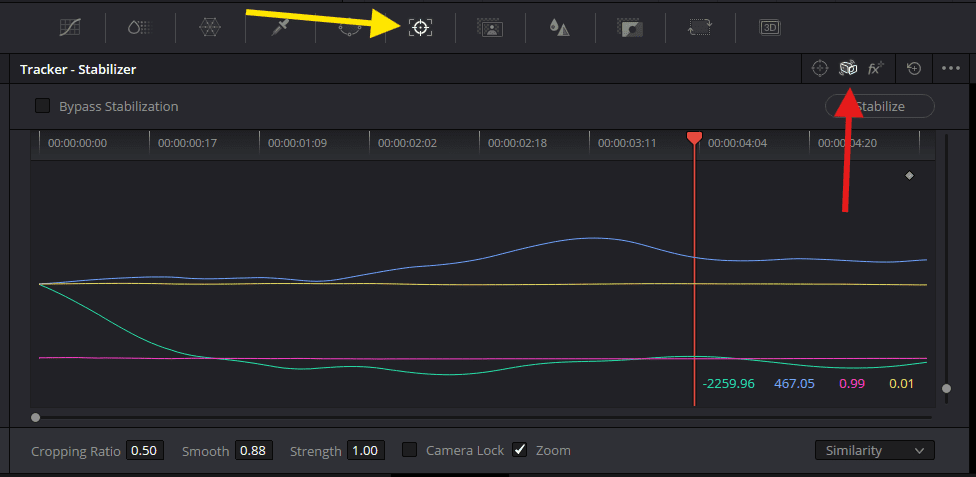
If we look at the tools at the bottom of the panel, you will notice that the modes, parameters, and functions are exactly the same as those on the Edit page. So why have the same tool in two places?
That’s because DaVinci Resolve started as a color grading tool. Only in the last decade or so has the Edit page developed into a powerful part of the software. Many artists still work primarily on the Color page, so having the tool available there makes sense.
With that, you should know that this tool is exactly the same as the stabilization tool found on the edit page. Just hit Stabilize and tweak your settings.
Avoiding overwriting your stabilization with pre-made color grades
While color adjustments are applied to individual nodes, stabilization is tied directly to the clip, not to any specific node. Because of this, applying stabilization on the Edit page and then using a pre-configured grade can cause issues. The grade may overwrite all existing parameters, including the stabilization added in the Edit page.
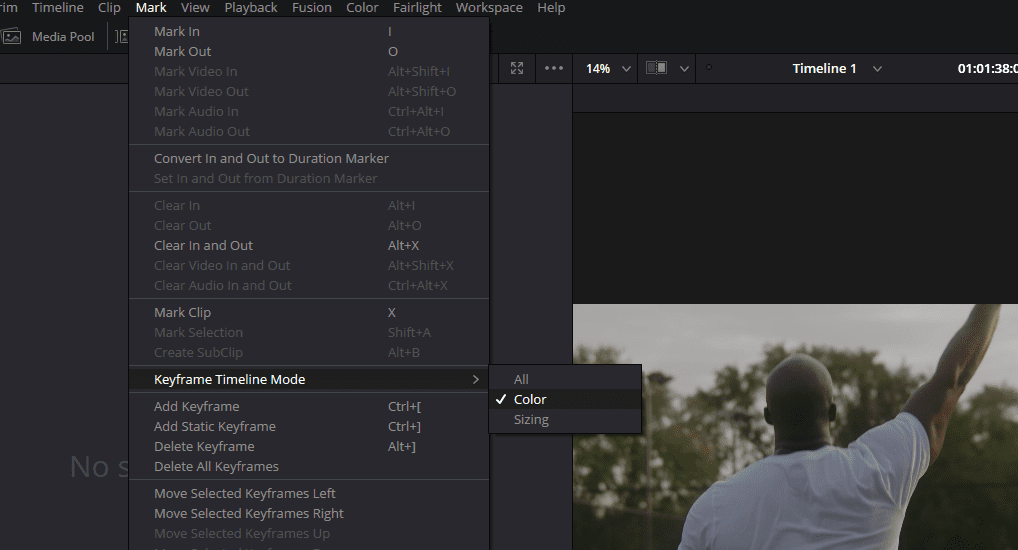
Thankfully, there is a workaround for this. Go to Mark > Keyframe Timeline Mode and change it to Color instead of All. This ensures stabilization data (applied in Edit) is left alone when copying a grade.
If you’re already deep into grading, handling stabilization on the Color page might make more sense.
Final Thoughts
DaVinci Resolve has one of the leading stabilization tools across the major NLEs on the market. It’s easy to use and produces great results – a far cry from the type of stabilization tools I had available in the 2000s. However, if there’s been one thing that’s remained the same, it’s the limitations around the type of footage you can stabilize.
If you’re sprinting while holding a light camera and the picture is jumping all over the place, most likely you’ll never be able to stabilize that footage properly. Although, with the abundance of AI restoration tools entering the market, that may change. Still, it’s important to make sure the footage you’re adding into DaVinci Resolve has been shot to facilitate stabilization.
For more on Davinci Resolve, be sure to explore more of our DaVinci Resolve tutorials for a wide range of tips and tricks. And if you’re looking for unlimited downloads of all the high-quality stock footage, music, sound effects, images, and pre-made DaVinci Resolve templates to help you create better video, a Storyblocks subscription is just a few clicks away. With Storyblocks, members save up to 3.5 hours a week by simplifying and speeding up their video production process.


